How to Find Your Christmas Style

A few years ago, we celebrated our first Christmas in our new house. I wanted to go all out and decorate. We bought a new (fake) tree at a black Friday sale and I made plans for the perfect decor to fill my new home. Our old tree was about 5 feet tall, and while it was a perfect fit in our tiny NYC apartment, it would look like a dwarf in our large house. With this new tree came the need for new ornaments. Since we had 3 cats, and hoped to have some kids soon after, we decided to go with plastic ornaments instead of glass. In case you aren't aware, it's really hard to find cute plastic ornaments. They're usually cheesy and cheap looking, without necessarily being inexpensive. I looked at all the pretty glass ornaments and felt envy for the types of people who could buy them. It felt like my childhood all over again.

finding-your-christmas-style-4.jpg

How my Christmas Past Affected my Christmas Present

You see, back at my parent’s house, we used to have this big beautiful Christmas tree. I remember making ornaments with my dad and putting up the same ones every year. Each one seemed to have a story and while it was kitschy, it was really sweet. We used multi-colored lights (because, you know, the 90’s!) and metallic gold fluffy garland. After a while, my grandmothers got sick and my mom did too. It took a heavy toll on her since she had to care for them, rushing from the hospital to the nursing home to see them both. My dad had to work a lot and my sister and I often ended up at his office with him. She and I would share his secretary’s chair after she left so that we could go online, since they had internet access there.

Because of all this stress my parents had, our house got forgotten. It filled with junk and we essentially became hoarders. I don’t use that term lightly- we were. The holidays became a little less glamorous for us. There was literally no place to put our tree anymore. Because my parents were so overwhelmed, we’d usually end up cleaning a spot for the tree and putting it up at the last possible minute- Christmas eve. After a few years, even this didn’t happen anymore. We bought a tabletop pink tree (the cutest!) and this replaced all our old decor.

Now, back to out first Christmas in our new home.

When my husband and I bought our house, this felt like a new opportunity to have that special Christmas I could only dream about. I had visions of Hallmark-movie-style decor in my head and I imagined a home fully decked out for Christmas. I bought a ton of new stuff to go with all the stuff I had brought over from our apartment. I had the perfect decor, the perfect home, and possibly even the perfect life. Finally, it was like everything had come together for me.

I'm not sure if it was the new house, but Christmas didn't feel like Christmas that year. The whole house had been decked out, but it somehow didn't look Christmas-y enough for me. Everyone else that came in felt the Christmas spirit, but I sure didn't. I struggled to figure out why as I packed up all my perfect decorations.

It wasn't until a month later, when I went into a thrift store near our wedding venue in Hawley, PA that I realized what had happened. I never had perfect Christmases growing up. We were a "put the tree up in a scramble on Christmas Eve" type of family. Perfect Christmas trees and decorations were only found in catalogues and hallmark movies. Cheesy, bright 90's holiday decor was all I ever really knew. So, while I might have dreamed about a day when I could have that perfect Christmas home, I didn’t truly feel like the kind of person who would have one.

It turns out, making a place feel like Christmas doesn't have to mean a perfect catalogue home. It can mean vintage ornaments, nostalgia, and the cheesy ornaments you had as a kid. Now, I try to keep my Christmas decor feeling fresh but also traditional. That means taking the same items out of storage year after year, and trying to buy ornaments and decorations that have meaning to me. It’s less about what’s pretty and more about what feels like me. I know my style will change over the years, but right now it’s a slightly nostalgic and colorful version of Christmas. A more upscale version of the ones I had as a kid, if you will.

To find your Christmas style, I’d recommend asking yourself these questions:

1. What did I love about Christmas as a kid?

2. What kind of decor am I drawn to? Think about colors and styles.

3. What’s my favorite piece of Christmas decor that I currently own? How can I add more decor like it?

4. What decor do I put up every year that I don’t like anymore? And, what don’t I like about it?

5. What color do I have most in my Christmas decor? Do I want to continue with that, or change it up?


How to Find Your Christmas Style

I’ve been asking myself what exactly I want my home to look like and what Christmas means to me. It turns out it’s less about being the picture perfect Christmas, and more about being my picture perfect Christmas!

What does your perfect Christmas look like? Are you into traditional colors, fun colors, muted colors? I think we all know which ones I’m drawn to, haha! Let me know your preference in the comments below!

Colorful & Glam Holiday Kitchen Upgrades

I took a look at my kitchen the other day and realized it needed a facelift. The counters were filled with all our junk, various appliances, dishes, baby items… you name it, the counter is covered in it! The issue with our kitchen was the same as everywhere else in our home- I didn’t love the items we had displayed in there, and therefore it didn’t matter that everything was covered with junk. What I mean by that is… when you’ve random stuff on your counter, it’s SO easy for the random stuff that should be there to get mixed up with clutter and suddenly you can’t see your countertops. Also, if there’s more stuff than there are places to put things, you end up in the same little pickle!

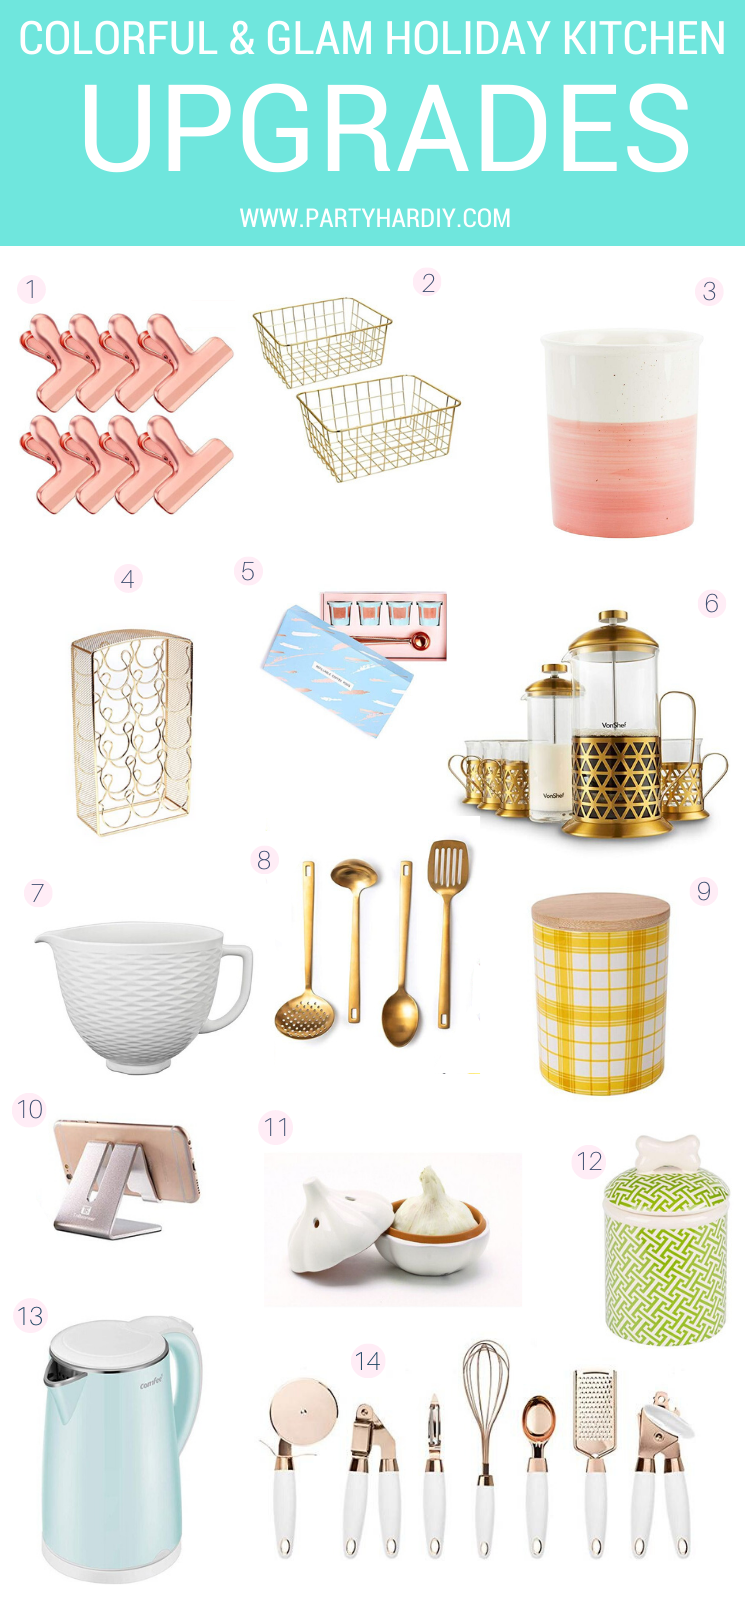
During the holidays, this problem gets even worse. Between the bake sales and guests coming over, it feels like the counters always get covered in items that don’t ned to be there! To combat this issue that we all face, I’ve rounded up 14 gorgeous, functional kitchen items that will elevate your whole kitchen and have you WANTING to keep it clean. Because when your kitchen accessories are a show stopper, you need to make sure everyone sees them!

*This post contains affiliate links

Between the bake sales and guests coming over, it feels like the counters always get covered in items that don’t ned to be there! To combat this issue that we all face, I’ve rounded up 14 gorgeous, functional kitchen items that will elevate your who…


1. Chip Clips- Ah, the item that started this whole post! My original chip clips were an assortment of adorable, cheap plastic ice cream cones, bows, animals… essentially, whatever someone found at a register and gave me because they thought of me! And of course, a few that I bought impulsively as well. But when we ended up losing and breaking most of these clips, my husband asked me to order a new set on Amazon. I was originally planning to get a plastic set again (because that’s what I’m used to!) and then I saw these beauties. They felt too fancy for my stale chips but you know what? My chips deserve to be fancy too.

2. Wire Bread Basket- I think this basket is so cute because it’s gold and gorgeous. However, the wire design ensures that you actually SEE your bread and therefore are more likely to eat it. I’m one of those “out of sight, out of mind” type of people so even something like bread can get forgotten! Right now, our bread is just tossed on the counter but prior to that we somehow acquired a black basket that had our bread in it. Neither was a very pretty solution! Now I’m antsy for a new basket!

3. Utensil Cup- I have a cute utensil holder on my counter that’s actually a large canister (minus the lid) but I love the idea of this cool, simple white and coral one. It feels so glam and upscale for a fraction of the cost! It adds such a subtle pop of color.

4. Keurig Cup Holder- In my kitchen, the Keurig just feels like an eyesore. We have a large black one that isn’t even made anymore. We need an adaptor just to use regular k-cups! We have a drawer-style cup holder which accentuates the dark hole that it creates. While I may dream about replacing my old keurig, I figured getting a nice k-cup holder to go next to it could be fun! I love this one because if you organize your k-cups in color order, you’ll have a glam little rainbow on your counter!

5. Re-usable K-Cups- If you want to reduce your kitchen clutter, save the environment, AND make your kitchen glam in the process, try switching to these pretties! I love the gold color and the fact that you don’t need to fill up a landfill with k-cups. (I should note- I don’t drink coffee and therefore don’t use a Keurig. But my husband does!) You can pop these in a cabinet or drawer since they’re so tiny which would save some much-needed counter space.

6. French Press Coffee Maker- If you prefer to get a little fancier (and more eco friendly) with your coffee, you can grab this french press! I love it’s gorgeous gold finishes and I think it would look amazing on your counter or stove. It also comes with a set of cups that matches which makes it perfect for guests during the holidays!

7. Ceramic Mixer Bowl- give your mixer an upgrade with this gorgeous bowl! Mine has a clear glass bowl and I know a lot of them have metal bows. Since they’re big and always sit on the counter, they could use a nice and spiffy bowl to catch everyone’s attention! 

8. Gold Serving Utensils-My bamboo serving utensils are literally falling apart (they’re breaking apart into pieces!) so I’ve been debating getting a new set. These gold ones are gorgeous! I can only imagine how pretty they’d make my countertop look as they glimmer in the light. I don’t like to cook, but these might change my mind!

9. Canister- I love using canisters in my kitchen for hiding the less-than-pretty stuff that needs to be accessible. Whether you fill it with rice, coffee, tea bags or sweeteners, this canister will perk up your kitchen while hiding your eyesores! I also love to place these in cabinets so that those look nice too.

10. Phone Stand- between recipes, kitchen timers, and text updates from family, we need to keep our phones handy all holiday season! This holder will keep your phone in place and safe while you do everything you need in the kitchen. No more crying over spilled milk- your phone is up and off the counter so it’s safe!

11. Garlic Keeper- before we got a garlic container, it always sat in the fruit bowl looking funny. This container fits your garlic perfectly and still looks adorable. If you keep a lot of garlic at home (like we do!) try this larger size.

12. Pet Canisters- Few things are as hideous as pet items. Between cardboard boxes of treats and giant bags for food, these items are totally necessary, yet very ugly. Since they need to be accessible, they often end up on the counter taking up space and being their ugly selves. So, I recently switched to canisters for our excess pet food and everything looks prettier now! You definitely don’t want to go for anything clear, except maybe for cute dog bone treats. I love how colorful but glam this canister is. I think I need one for Lexie’s treats now!

13. Electric Tea Kettle- ok while we are on the topic of morning drinks, let’s talk about tea! I love tea and have several cups a day. I have a stovetop kettle which looked cute in the store and became ruined within a month of regular use. I guess they can’t withstand the heat and turn black! I love the idea of a countertop version, and this one automatically turns off when it’s done instead of whistling! Paired with a tea bag storage box you’ll be serving your guests tea easily with less mess! 

14. Utensils- if you’re anything like me, all your kitchen tools are random items you acquired over the years. Upgrade to a gorgeous matching set that will make everyone jealous! This set comes in a variety of handle colors, like navy, mint and pink. It’s sure to match any kitchen! It’s also very reasonably priced so you don’t even need tot talk yourself into it!

With a few small updates, your kitchen and countertops will look amazing once again. I find that with less on the counter and having things there with a purpose, I’m able to keep it clean much more easily. And also, I WANT to keep it clean! I love to show off the gorgeous items I find, rather than my extensive collection of junk I tend to keep.

What do you think of these items? Will you be ordering some? Any tips for keeping a counter clean or items you love? Let me know in the comments below! 

The Simple Solution For Ruined Chairs

When we first purchased our house, I was going through a very gray phase. I had seen some cool homes that were very monotone and I liked the idea of purchasing neutral furniture so that I could add any color through my decorating. I figured, if I had gray furniture, I could add some colorful rugs, throws, pillows, etc. and swap them out for the seasons. But I mean… everything I got was gray. And I mean EVERYTHING. Couches, chairs, curtains, even the wall colors! It was never-ending and earned my home the nickname “50 Shades of Gray”. I couldn’t even be mad at that nickname… I’d earned it and within just a couple of months, I started to hate all the gray in my home. 

I sat there for 3 years, dreaming of a day when we could re-decorate. Getting all new furniture wasn’t in the plans so I just had to wait. In the meantime, I loathed my home and my furniture, especially my dining chairs. You see, we have 3 cats who were very well behaved in our apartment. They never scratched anything. However, as soon as we moved into our home, they decided they loved to scratch. Their top choice? My brand new (very grey) dining chairs. Within a few months, they went from pretty, fancy-ish chairs to destructed Western chic. My cats had shredded the edges which looked like bad fringe. Some of the chairs even had the foam sticking out! 

Looking to fix your upholstered chairs? I’ve got the perfect solution for you! Whether you need to pet proof your home or protect dining room chairs from kids, you’ll be able to do it in style. Click to see how I transformed my dining room for less …

Once again, I planned for a day when I could replace the chairs I had JUST spent several hundred dollars buying. And every time I would walk by that table, I would think about it. One day, I was perusing Amazon for a couch cover since our dog Lexie had been getting our (gray) couch super stinky, and that’s when I stumbled upon these awesome chair covers. I was so excited- I could get new chairs, without having to buy new chairs?! WHAT?!! The price was right, the style was perfect, and now I just needed to pick a color. 

Looking to fix your upholstered chairs? I’ve got the perfect solution for you! Whether you need to pet proof your home or protect dining room chairs from kids, you’ll be able to do it in style. Click to see how I transformed my dining room for less …

Oh, I forgot to mention the reason why my house was gray. You see, I went through a period where I was afraid I’d regret picking something in a specific color. I vividly remember it starting one time in college. I was trying to figure out which awesome iPod nano color I wanted, only to settle on the gray one because I was too afraid I’d end up regretting the blue. It only got worse from there, as I always picked a neutral color from then on. It was almost a way that I hid myself and my childish nature. The truth was that I loved colors, I just lacked the confidence to pick one.

Fast forward to the chair covers. I didn’t know which way to go. Did I choose gray again? But ugh… how about aqua blue, like the rest of our home? Meh. White? Taupe? Nothing in my house is taupe. So, I bookmarked it and put it aside for later. Here’s the thing- these chair covers are easily removable and affordable. So you know what I did? I BOUGHT THE FREAKIN PINK ONES. I thought they were so pretty and I imagined my husband being annoyed but I did it anyway. I figured, worst case, I can buy another set later to replace it with. I thought the pink would be SO cute with all my holiday decor!

Looking to fix your upholstered chairs? I’ve got the perfect solution for you! Whether you need to pet proof your home or protect dining room chairs from kids, you’ll be able to do it in style. Click to see how I transformed my dining room for less …

When the covers first arrived my husband was a little confused by the pink. But, once they were on, he said that it already looked so much better than before. No longer did we have shredded chairs that informed everyone that came to our door that we had 3 naughty cats. Instead, we were classy folks again.

These chair covers are machine washable, easy to put on, and come in so many colors. They’re really affordable (about $8/chair) and so soft! I no longer have to worry about guests coming over and dripping on the chairs, or having Hailey wandering around with her sticky fingers. If a cat lays down on the chair and covers it in fur? Eh, that’s ok too! I feel like I not only got a new look for my dining room, but I got some peace of mind too. If one cover gets horribly ruined, I can replace it. Much cheaper than if a chair gets ruined!

Looking to fix your upholstered chairs? I’ve got the perfect solution for you! Whether you need to pet proof your home or protect dining room chairs from kids, you’ll be able to do it in style. Click to see how I transformed my dining room for less …

I love our “new” dining room now. I’ve been covering our black Ikea table (that I also hate!) with a sequin tablecloth which is breaking up some of the darkness over there too. Slowly but surely, I am making changes to our home with a small budget. Although I may dream of having my amazing, Pinterest-worthy home some day, I can make small steps to improving the one I have. I guess from seeing everyone overhauling their furniture regularly, it made me feel like that was the only way to get a new look. Turns out, I could find my own way. A much more affordable way ;)

PS- You can find the DIY table runner here and the floral pumpkin DIY here!

I do plan to go back and smooth out some of those wrinkles, since I think I pulled them down a little too much which left a bunch of excess at the bottom. But overall, I’m SO happy with how they look! And, I love that I can give my living room a new look with ease.

So what do you think of these chair covers? Will you be getting a set for your chairs? They’re honestly great for cat owners and parents!

DIY Colorful Leaf Runner

My table is a constant dump zone at my house. Pretty much any flat surface becomes a place to put things down “just for a minute” aka a month. Because of this, I decided that my flat surfaces didn’t need to be clear, but they did need to not have clutter. The best way for me to do this was to decorate them! Since everything for fall has pretty much the same orange and brown color scheme, I figured I’d make my own table runner this year. Would you believe I made it with some leaves I got from the Dollar Tree?! Yep, just $3 for 3 packs of these bad boys, plus some acrylic paints that I had on hand. I say it all the time, but my favorite way to do crafts is by popping on a seasonal movie after everyone has gone to sleep and getting to crafting! This time, I watched The Object of My Affection (streaming on Hulu and HBO Go) with a glass of wine. In case you’ve never seen it, it’s The One Where Rachel Falls in Love With Phoebe’s Second Gay Ex-Husband, Mike. Just kidding- kinda. This project was a great way to get in the spirit, but I also think this would be fun to make while watching all the Friends Thanksgiving episodes in a row! You all know I’m a huge Friends fanatic, and I love to watch the holiday episodes.

The final result is a pretty (but not stuffy) table runner that you can use in your decor every year. I don’t recommend putting food on or near it, since it’ll probably stain the leaves. But, it’s perfect to use leading up to Thanksgiving dinner on your table, buffet or entry table!

Since everything for fall has pretty much the same orange and brown color scheme, I figured I’d make my own table runner this year to go with my colorful thanksgiving decor. Would you believe I made it with some leaves I got from the dollar store?! …

You will need:

Approx 300 leaves (from Dollar Tree or similar here)
Fabric glue (here)
Tulle roll (from Dollar Tree or similar here)
Wax paper (here)
Acrylic paint (similar here)
Scissors (similar here)

Since everything for fall has pretty much the same orange and brown color scheme, I figured I’d make my own table runner this year to go with my colorful thanksgiving decor. Would you believe I made it with some leaves I got from the dollar store?! …

Directions:

  1. Paint your leaves in your choice of colors. I used Martha Stewart paints because they’re nice and thick. The colors I used were Pumpkin, Mermaid Teal, Strawberry, Pink Raspberry, Mango and Moonstone Purple. I used lighter colored paints for lighter leaves, and moved up with the colors from there. I did 2 coats for the purple because it was light.

    • Note: I tried a few different methods for painting the leaves. The fastest method is to take a large box (like an amazon box!) unfold it, and place it across your table. Lay out your leaves in sections, and paint each section in your choice of colors. This allows for less thinking (just keep painting until you run out of leaves in your section) and also goes faster because you don’t have to stop to make more space or shuffle things around.

  2. Once your leaves have dried, assemble them on your tulle or fabric. You want to come up with a general plan for them, and then start gluing as you go! I used fabric glue so that it was still flexible to fold up and store away easily. Put down your wax paper as a buffer to protect your surfaces.

    • *Note #1: don’t use Fabri-Tac on varnished furniture.

  3. To get the same look I had, you’ll want to glue your leaves facing outwards along the edge of your tulle. Do this for the full perimeter. I didn’t cut my tulle (yet) because I wanted to make sure I had enough leaves!

    • *Note #2: Fabri-Tac took my nail polish off and kinda melted it. Be careful when using it with a manicure! I was wearing regular polish, not gel.

  4. Put a row of leaves going in between the leaves you just glued down, alternating the colors. I didn’t follow a pattern so that it looked natural.

  5. Put a leaf in the middle, alternating the direction. I wasn’t too cautious about bald spots or gaps because it added to the “tossed leaf” look. If you dislike that, you can pile them on but be sure you have enough leaves!

  6. After you glue down your leaves, peel it off the wax paper so it doesn’t get stuck on when it dries. I let mine dry laying flat, glue side up.

Since everything for fall has pretty much the same orange and brown color scheme, I figured I’d make my own table runner this year to go with my colorful thanksgiving decor. Would you believe I made it with some leaves I got from the dollar store?! …

That’s all folks! The most time consuming part of this project is painting the leaves. If you want to save time, you could always spray paint them instead! Personally, I find painting to be somewhat therapeutic which is why I always go for acrylic paint. Spray paint would also go on with better coverage, if you’re interested in more vibrant colors!

What do you think of this project? Will you be making it for your Thanksgiving decor? Where will you put it? Let me know in the comments below!

The DIY Holiday Photos Toolkit

Ho Ho Holy Poopsicles, the holidays are coming! If you're thinking that it seems like just yesterday you put that Christmas tree away, you're not alone! The holidays seem to sneak up on me every single year. I am definitely excited for them, but somehow never quite prepared. One thing that definitely gets pushed off is my holiday card photos! This year, I decided to take matters into my own hands and get those pictures done before Halloween even rolled around! If you're unsure how to even go about taking your own photos (that don't look as pathetic as a homemade gift that you whipped up at the last second) then I've got just the thing for you! I've rounded up 12 items I love using for my family photos, so you can shoot for success. Ya see what I did there?

*This post contains affiliate links

Looking to take your own holiday card photos? I’ve got my 12 essentials for DIY holiday photoshoots that will ensure success! #diyholidayphotoshoot #diyfamilyphotos #familyphotography

1. Tripod- If you want to try and take your own photos, I would highly recommend this tripod! It folds up really small, plus you can tilt the head so that you can take landscapes or portraits! It's light, compact and folds up small. It's perfect for taking on the go and storing in a closet when it's not in use. This is the exact one I use for my photos!

2. Phone Tripod Mount- If you want to attach your phone on this tripod, you'll need a special adapter. I use this one, which does the trick! You just swap out the head it comes with and then expand it for your phone. The great part is that it's adjustable, so you can use anyone's phone. I'd recommend checking the measurements if you have a newer iPhone though. Those things just keep getting bigger and bigger, so I'm not sure if this particular one will get big enough.

3. Mini Tripod- If you want a tiny tripod for a tabletop or even easier portability, try this one! I haven't used this one personally, but it had great reviews on Amazon. I'm considering getting one myself, especially since I like to take videos of Hailey doing cute stuff. She always stops when she sees me holding the camera, so with this I can go into stealth mode! If you want something more affordable, try this one instead.

4. Box Lights- These are a bit of an investment, but I honestly can't recommend them enough! I use them for practically all my blog photos and occasionally whip them out when the lighting isn't ideal for portraits. Another option is these umbrella lights, which aren't quite as bright. Both of them fold up super tiny and can take up just a corner of a closet! It's actually pretty remarkable how mighty yet tiny they are. Just a note that these won't make a dark room bright, but they will assist in compensating when the room just isn't bright enough for a good picture.

5. Holiday Blanket- You always need a great blanket for holiday photos! Use it for an accent on the couch or bed, to add warmth to a photo, or to snuggle and wear in your pictures. Either way, you really can't go wrong with a holiday blanket! I used one in my photoshoots, then towards the end my sister wore it on her head to try to get a laugh out of Hailey. She did smile, but not nearly as much as I did. I truly wish I had taken a photo from my angle. It was quite comical. If you don’t celebrate Christmas, try this more seasonal snowflake blanket instead or try this fun puppy blanket if you like something more whimsical!

6. Stockings- Some cute stockings hung on the chimney with care, or held as a prop, are essential for a fun Christmas photo! I also love seeing them hung at the foot of a bed. I love these because they' look so soft and cozy with the knit pattern and fur. For a little added sparkle, try a set of these!

7. Small Tree- If you're not ready to whip out the giant Christmas tree and the whole shebang, get a smaller tree that you can put in the background of your photos! This one is a nice small size but also decorated, which means less work for you! After the photo session is over, you can place it near your fireplace for some fun festivity, or put it in your kitchen, dining room, or kids' room to keep the holiday fun going in the whole house!

8. Antler Headbands- I love holiday themed accessories and I cannot lie, you other sisters can't deny. When a girl walks in with an itty bitty babe, and some antlers in your face you get sprung. Ok, things got a little cheesy there for a moment #sorrynotsorry but I love Christmas antlers. I can be found sporting them for every holiday themed event, from Holiday photos to Christmas parties to actual Christmas day. Oh, plus trimming the tree, seeing the holiday lights, baking cookies... They're my favorite! I just bought this fun pastel set but you can always go more traditional with a gold set.

9. Christmas Book- This makes a great prop and distraction for your photos! If your kids won't sit still, try giving them a brand new or favorite book to read. Maybe even add something silly on the pages to get a laugh out of them! Hailey loved this book because Santa has furry beards! You can also go more traditional with The Night Before Christmas, a Disney book, or a Hanukkah book.

10. Wreath or Garland- Whether you're holding a wreath for a pop of color, or place a garland at your headboard, they're perfect for adding some holiday spirit without much effort! I used a white garland from Michael's for my holiday photos, and didn't even have to attach it to the wall. I just stuffed it behind the headboard and made sure it was as close to the wall as possible! The best part is that adding these wreaths or garlands can really help you to bring in or enhance your color scheme. I knew I wanted my photos to be colorful and airy, and my garland did that! You could also go more traditional or fun and festive.

11. A Great Camera- You can definitely use your phone for your pictures, but I would highly recommend getting a camera if you’ve been on the fence! I personally have the older version of this Canon EOS Rebel (mine is the T6) but this newer one has such great features! Touchscreen is a newer feature, plus this set includes a remote which means super easy shooting!

12. Stepstool- If your friendtographer is short, you’ll definitely want to have a tripod! This one is SUPER light but also very sturdy. Perfect for taking on the go and being super safe while you’re at it! Why do you want a step stool, you may be asking? Because taking a photo from slightly above= very flattering. Taking one from below means all the chins. You’re welcome!

With these items, your holiday cards are sure to be a hit at the dinner table, unlike Aunt Sally's figgy pudding. If you're unsure how to even go about planning and executing your holiday photo shoot, I have a treat for you! I've developed a course that gives you my step by step system for planning, shooting, and editing your holiday photos! It's called Sleigh Your Holiday Photoshoot, and it's a game changer for the "I'll just do the photos myself, thanks" crowd!

It's the exact method I use for taking my blog and family photos, which I've perfected over the years. You'll be able to take your holiday photos in 5 days or less, with step-by-step videos and checklists to help you along the way! Everything is short and sweet, but super actionable and helpful. You'll be able to match those Pinterest inspiration photos in no time.

What's an essential for you when taking family photos? Is it a toy, a gadget, or maybe snacks for bribing the kids? Let me know in the comments below!