Adding a Pop of Color to Your Wedding

When you think of weddings, you think of white. While some may see that as very limiting, I see it as a blank canvas to incorporate any color you wish. Often, people add "wedding colors" and it's usually one shade of a color, like a deep purple or emerald green or blush pink. What if, instead of focusing on one color, you added shades of many colors? I think it would be a lot more fun (and a lot less stressful) to fill your wedding with complimentary hues. 

When it comes to adding some color (and fun!) to your wedding, look no further than Oriental Trading. They've got everything you need for weddings, whether you want to do a few crafts projects, get something that's personalized, or something that's ready to go out of the box. Plus, with their new Marry Me page of their website, all the wedding items are in one easy to find place. I call that a win-win.

*Note: This post is a collaboration with Oriental Trading, but all opinions are my own. My love affair with them started way back when I first got their catalogs as a kid!

Let those table numbers stand out! Click to see how I added a modern twist to this traditional wedding element, along with 2 other ideas to add a pop of color to your wedding!

Oriental Trading has everything you need to craft any project for a wedding or a party. Today, I've got 3 fun and easy projects you can make using Oriental Trading products and craft supplies. I've linked all the products I've used, so you've got everything you need in one easy-to-find place! Ok, enough with my blabbing... Let's get crafting!

Jordan Almonds 

Jordan Almonds don’t have to be boring! Click to see how I added a modern twist to this traditional wedding element, along with 2 other ideas to add a pop of color to your wedding!

You will need:

Jordan Almonds in your wedding colors (I used coral, light blue, and pink)
White Tulle (here)
Contrasting Ribbon (here)
Thank You Charms (here)
Spoon (here)

Jordan Almonds don’t have to be boring! Click to see how I added a modern twist to this traditional wedding element, along with 2 other ideas to add a pop of color to your wedding!

In many cultures, it's traditional to give out Jordan Almonds at a wedding. I'm Greek, and I can tell you for a fact that you can't attend a Greek wedding without receiving one of these bombonieres! For more info on Jordan Almonds, check this out.

How To:

Jordan-Almonds-GIF2.gif

1. Pick Jordan almonds in colors that match your theme.

2. Place 5 almonds in the tulle. I started by mixing my colors, but I realized I preferred all one color with a contrasting ribbon.

Jordan Almonds don’t have to be boring! Click to see how I added a modern twist to this traditional wedding element, along with 2 other ideas to add a pop of color to your wedding!

3. If you want the bow in the back, loop your tag onto the ribbon. If you want your tag in the front, add it as you're making the loop of the bow. Oriental Trading also offers personalized ribbon, which would be even better to add! 

4. Once you've decided how you want your bow, slide your almonds into the middle of your tulle, grab the sides, and tie your ribbon around it in a bow.

Jordan Almonds don’t have to be boring! Click to see how I added a modern twist to this traditional wedding element, along with 2 other ideas to add a pop of color to your wedding!

Table Numbers

Let those table numbers stand out! Click to see how I added a modern twist to this traditional wedding element, along with 2 other ideas to add a pop of color to your wedding!

You will need:

White Table Numbers (here)
Paint or Spray Paint (here)
Paint Brushes and Palette (similar here and here)
Gold Foil (here)
Gold Foil Adhesive (I used this one)
Gold Glitter (here)
Mod Podge (here)

Let those table numbers stand out! Click to see how I added a modern twist to this traditional wedding element, along with 2 other ideas to add a pop of color to your wedding!

People need to know where they're sitting, right? Why not lead them there in the brightest, glitziest way possible?!

How To:

1. Paint or spray paint your table numbers, but leave the edges blank. Do 2 coats, or as many as it takes to get smooth coverage, and let dry. (FYI- I used paint).

2. Paint the white edges of your numbers with foil adhesive. Work carefully so that you don't get it off the white edge. It sticks to anything with adhesive, so heed my warning and be careful!

3. Wait about 20 minutes for it to cure and be slightly tacky. Fun fact- this stuff dries sticky, so even if you wait a little too long, it'll still be sticky for the foil.

Let those table numbers stand out! Click to see how I added a modern twist to this traditional wedding element, along with 2 other ideas to add a pop of color to your wedding!

4. Take your foil and cut/rip to size, then attach it to the edges of the numbers. Take your stiff brush and brush off any extra foil. This stuff gets messy, so put a paper or a plate underneath so you don't make a huge mess :)

5. To do the glitter edge, mix gold glitter with mod podge. Using a paintbrush, paint the mixture onto the edges in small sections. Before the mixture dries, sprinkle some glitter onto the wet glue to cover any bald spots. Continue until you've done the whole perimeter, then go back and fill in any bare spots.

6. To travel to the venue, wrap each with white tissue paper to prevent scratches. Do not assemble them until you arrive, as they are fragile and may snap in transit. 

Let those table numbers stand out! Click to see how I added a modern twist to this traditional wedding element, along with 2 other ideas to add a pop of color to your wedding!


Welcome Basket

Your welcome basket doesn’t have to be formal! Click to see how I added a modern twist to this traditional wedding element, along with 2 other ideas to add a pop of color to your wedding!

You will need:

Wooden box (I used this one, but this one is better!)
Acrylic Paints (here)
Paint Brushes and Palette (similar here and here)
Self Adhesive Letters (here)

Your welcome basket doesn’t have to be formal! Click to see how I added a modern twist to this traditional wedding element, along with 2 other ideas to add a pop of color to your wedding!

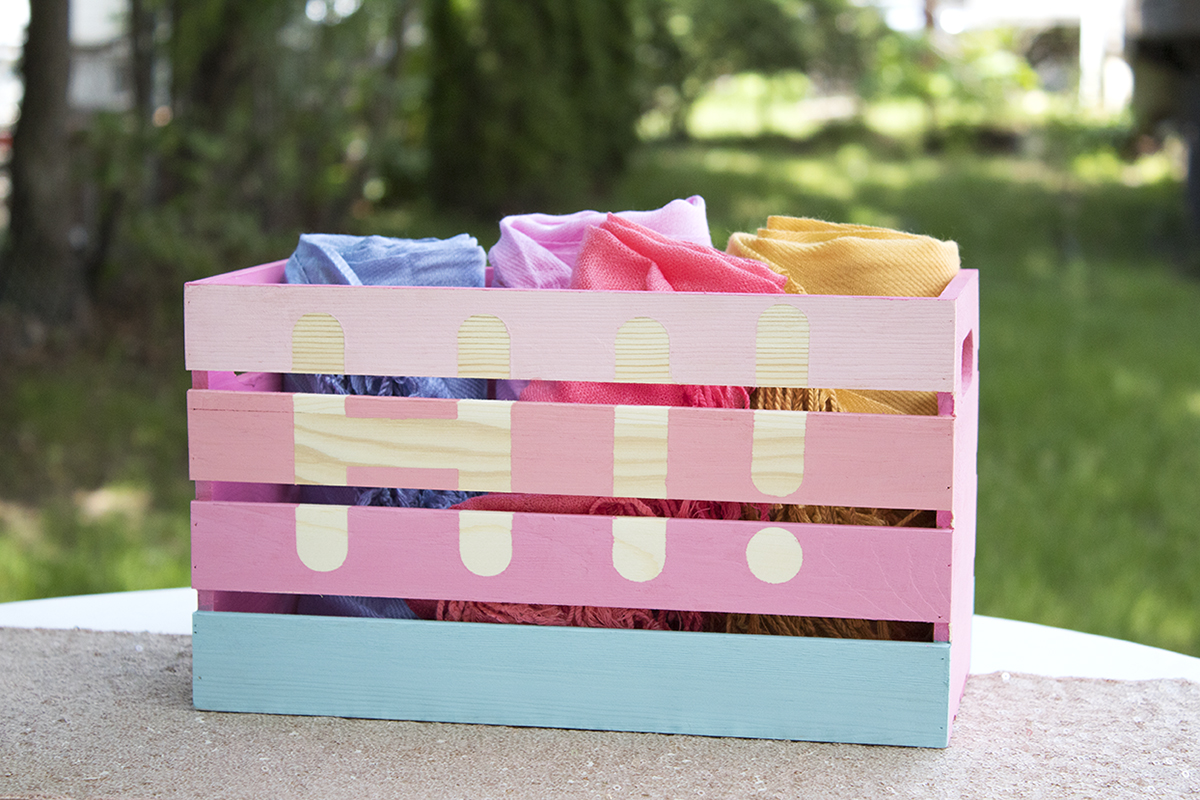
Show your friends and family that this is bright occasion from the start with this fun welcome basket! You can also re-use it after the wedding to hold mail or greet guests in your entryway!

How To:

1. Take your letters and put your message on the box. I chose to keep it simple and write "Hi!" You can also do the couple's initials or a monogram.

2. Mix up your paints until they are the right color. Use a toothpick or a thin paintbrush to stir. If the paint is too light, it'll make it hard to read the Hi, so be aware of that when painting your box.

Your welcome basket doesn’t have to be formal! Click to see how I added a modern twist to this traditional wedding element, along with 2 other ideas to add a pop of color to your wedding!

3. Carefully paint your basket. I did a different color for each bar to keep it interesting.

4. While your paint is still wet, carefully peel off your stickers using tweezers. If your box is like mine, I recommend you actually don't paint the inside of the box. It got really tricky with all the little rungs. Especially since I made my own colors, because I found that I would run really low and have to try really hard not to run out before I finished. 

5. Place your box on your welcome table and fill it with pashminas, ceremony programs, or bubbles!

Your welcome basket doesn’t have to be formal! Click to see how I added a modern twist to this traditional wedding element, along with 2 other ideas to add a pop of color to your wedding!

With a little bit of crafting, and a whole lot of imagination, you too can make your wedding unique with a fun pop of color. I've got a follow-up post coming with ideas for getting your gals together for a fun crafternoon, so stay tuned!

Be sure to visit Oriental Trading and their Marry Me page to start customizing your own wedding!

So what do you think? Will you be adding a pop of color to your wedding? How do you plan to do it? Let me know in the comments below!

Wedding Planning Update- Just 3 More Months!

Oh my gosh, you guys!!! My wedding is less than 3 months away. 87 days!! I can't wait for it to be here. I feel panicked because I have so much to do, and also feel sad that it'll be over soon. All at the same time. I've basically become an emotional mess lately and even the smallest things make me cry. I'm that person now. Anyway... here's what's been happening. 

Wedding Update- 3 More Months! This month we're chatting about charger plates, choosing suits, favors, and more! Click for the full post.

Invites-Picked and Packed!

Ah, invitations. The bane of my existence for the last 8 months. I really wanted my sister to design some invites for us, and her first draft was really cute! Unfortunately, as with many DIY projects, these were going to cost wayyyy more to print them ourselves than to purchase pre-made ones. And so we sadly had to scrap our idea :( Luckily, we were able to find some nice invitations online from Wedding Paper Divas. With a half off coupon, we were able to purchase them for $422.80, including custom foil, expedited shipping, and addressing the envelopes! Our original quotes were over $1k, and to custom print with foil we were quoted over $1,800 (!!!), so this was an amazing price. They're all packed up and ready to get shipped this week.

Wedding Song- Chosen!

They say when you snooze you lose, but for me it worked out. I was too tired to get up when my alarm went off, so I stayed in bed listening to the radio and heard a song that I thought would be perfect. I looked up the lyrics and started crying. But, I hated the radio version so I found a cover! I like it so much better, and every time it comes in the radio when we drive I get so emotional and excited for our wedding. I can't wait to dance together.

Wedding Update- 3 More Months! This month we're chatting about charger plates, choosing suits, favors, and more! Click for the full post.

Bridal Party Outfits- Done!

Dresses have been purchased! My sister got her dress from RK Bridal in the city (where I got my dress) and my mom got hers from Lord & Taylor. Since my sister is technically my only bridesmaid, this made things a bit easier. We went to a few stores and she tried on a bunch of different styles, but we settled on a lace and chiffon one. My mom has 2 dresses she bought and is trying to narrow it down to see which one she likes better. My dad also found his suit, a black Sean John suit haha.

Suits- Explored

We started looking into a suit for John and his brother. We checked Jos. A Bank, where the salesman was very kind. John has really broad shoulders (which I LOVE) but they make finding a suit difficult. Most suits made for a man with shoulders as large as his are much larger men in general, so the jackets looked giant on him. They suggested making a custom suit, which would only cost slightly more than buying one off the rack. I wasn't entirely sure what I wanted yet, so we paused that. Then, we went to men's warehouse, where we didn't see any colors we liked. The salesman told us that we should come back in early June to see the new colors, so we decided to wait until then before making any decisions. We are going this weekend to see them, and hopefully we can decide on his suit! 

Wedding Shoes- Ordered! 

Since our wedding ceremony will be outside, I wanted a wedge instead of a heel. I also wanted them to be pink and to have some sparkle. Luckily, Badgley Mischka had just what I needed. I got them on Amazon and I saved about $70 on them! The wedge heel has some texture on it which I love, and they actually feel pretty comfortable. 

Wedding Update- 3 More Months! This month we're chatting about charger plates, choosing suits, favors, and more! Click for the full post.

Napkins- Ordered

We ordered some cute custom printed napkins from For Your Party to put out at cocktail hour. I had already wanted to order some, and they had them at a wedding we went to. It was super cute! Luckily, this made convincing John to get them that much easier. I'm sneaking Disney references into my wedding any way I can, and these napkins were no exception ;)

Charger Plates- Ordered

This was a debate from a few months ago when we were wondering how nice we should go with the table settings. We looked into a rental company and there were all sorts of options for chargers. In the end, it didn't seem worth it to me to rent, essentially, a fake decorative plate for $5/piece. I was able to purchase them from Dollar Tree for a fraction of the cost, less than $200! Plus they're mine to keep so I can sell them after the wedding if I want to. I had purchased the same ones for my Dollar Store Easter Decorations post and I think they look pretty good! 

Wedding Update- 3 More Months! This month we're chatting about charger plates, choosing suits, favors, and more! Click for the full post.

Favors- Picked! 

Hooray! Our favors have been ordered! I don't want to give too much away since I know my family likes to read these updates (oh, hey guys!) but we ordered some cute and whimsical favors for everyone. We ordered them from Wedding Favors Unlimited, which offers price matching and $20 off if you find a lower price than theirs! Also, it shipped to us really quickly! From the date we ordered, it took 2 days for them to arrive. We'll also be giving out Jordan almonds since it's traditional and there should at least be some traditional elements, right?! 


Need to do:

Rehearsal dinner- Booking the venue for the rehearsal dinner has been on my list for a long time! Well actually... it was on John's. But somehow it made its way over my list, as it seems everything else has! We still haven't officially booked this and I'm so eager to cross it off. We are so close on this one.

Plan our ceremony- One of our friends is performing the ceremony, so we need to finalize all the little details to make it a great and memorable ceremony.

John's suit- Although we browsed suit options, we need to get his suit ordered since we are thinking of doing a custom suit. 

Centerpieces & decor- We ordered our flowers, but I want to buy any other centerpieces and decor items we need!

Schedule dress fitting- My dress is set to arrive next month, so I need to figure out exactly when and make an appointment for a fitting and alterations. I'm a little anxious about that, since there will be about 6 weeks between receiving my dress and my wedding day. No pressure.

Veil and accessories- Um, yea. I need to get on this! I'm going to attempt to make my own veil since they are SO expensive to buy. I want to try to make it soon, and if it doesn't work out, I'll bite the bullet and buy one. I also need jewelry, undergarments, hair accessories, and a purse I guess? 

Dresses upon dresses- I need to get a dress for the rehearsal dinner, the bridal shower, the bachelorette party, the 2 other weddings I have this year... Here, just take all my money.

Get legally wed- Our wedding ceremony will only be symbolic, so we are going to city hall (or something) to be legally married. We need to do this sorta soon, since some over-eager bozo decided to book a ticket in her new married name, thinking it would be really easy to do a name change. Yeaaaa.

If you want to learn more about planning a Pinterest worthy party, be sure to sign up to get your FREE Anatomy of a Pinterest Worthy Party guide! It's full of helpful hints on how to pick a theme, the little details that will make your event unique, and tips to take great photos of your event. And, there's even a checklist so you don't forget anything! So what are you waiting for? Get yours now!

Although I am pretty overwhelmed with all the stuff I need to do, I like these updates because it shows me that although the To Do List is still reaaaally long, it's actually getting shorter and things are getting done. So, what's your favorite part of weddings? Is there something you saw once that you thought was great, or terrible? Any tips to make a wedding the BEST WEDDING EVER?! Let me know in the comments below!

Defining WellKeptChaos- Finding Yourself by Embracing Your Flaws

When I first started my blog, I intended for it to be an organization blog. I had just bought a house, and I really wanted to blog about it. It was going to be a lifestyle blog, but I’d provide all these handy tips to get your stuff organized. Hence the (old) name, WellKeptChaos. Learn more about the name change to Party HarDIY here.

DSCF8098.jpg

As it sometimes goes, the blog got reworked and reformed. I realized I didn’t have a passion for organization (and my house on any given day can prove that…) so I decided to go for my next passion- party planning. I did that for a bit, but then my other passion came out, which was crafting. And the blog went in that direction. I even thought about changing the name of the blog. I lined up my new social media channels, bought the domain, and just about everything else! But everyone told me they liked the old name, and so there it stayed. Somehow the name seemed perfect, but also like it didn’t fit either. (UPDATE: You can read about the name change here)

The truth is that through all these transitions, I never really felt like I found my niche or my audience. I, like my blog, wasn’t any one thing. I like to do a whole lot of everything. I have ADD and it was, again, rearing its ugly head. I wanted to do #allthethings and trying to fit myself into a box of a “diy blogger” or a “party blogger” wasn’t really doing it for me. Because the truth is, I want to talk about everything. And I can talk A LOT.

So I sat here, on this chilly almost-June day, and I felt defeated. Not just with my blog, but in general. Who am I and what am I doing? What defines me? Is it my blog, my job, my life? And if any one part changes, do I change? And I thought about that name I created for my blog, and how off it seemed, and it finally clicked. The WellKeptChaos was ME. But not just me… in a way, WellKeptChaos is all of us. 

WellKeptChaos is trying to be an adult when you really still feel like a kid. It’s trying to get your finances in order when you just want to go shopping. It’s trying to hustle and start a business when you have absolutely no frickin idea what you’re doing, but you’re not going to let that stop you. It’s all the very many pieces of your life and how they fit together and make you YOU, when they don’t seem to even make sense together. How a person can be lazy in life but dedicated in their business. How a person can love food and hate cooking. How a person can be obsessed with becoming an adult but not feel ready once they are. These are our quirks, these are our personality traits, and this is our chaos. 

But despite the chaos, despite the pitfalls, and despite the world around us trying to change us, we are doing it. We are being ourselves, we are fighting the norm, and we are trying to find our way in the world. We are changing and adapting every single day, even if we don’t feel it, or sense it, or even believe it. Every day is a change, every day has potential, and every day we learn. And although we might be panicking inside, we put on our big girl (or boy) pants and we get through that day with a smile. We pretend we know what we are doing, we have a sureness in our voice that even we don’t believe, and we pretend we’ve got our shit together. That is our WellKeptChaos.

One thing I always liked to do, and wanted to do, was to help people. And I think that with all the very many things I do on my blog and in my life, I do help people. I’m not an art teacher, but I can sure as heck help you DIY almost anything. I’m not a party planner, but I can plan a shindig that looks like it came out of a magazine- and tell you how to do it too. I’m not a life coach, or google, or the town wiseman, but that doesn’t stop people from coming to me for advice, for someone to listen to them, or someone to encourage them to get their “show on the road”, so to speak. Throughout my life, my career, my jobs, I am that person that people go to for help. It’s something I always knew but also always overlooked. By not being perfect at any one thing, I was fairly proficient in a great many things. And this allows me to help a whole lot of different kinds of people.

So who is my target audience? Anyone that needs help getting their life together. Anyone who needs a girlfriend to tell it to them straight, but with kindness. Anyone that needs help doing this thing called adulting without going absolutely bonkers in the process. She’s probably a woman, she’s probably in her 20’s-30’s, and she’s probably like me. Maybe she’s someone that wants to laugh at her failures while she cries, maybe she wants to dress better but she’s SO bad at it, or maybe she just got her apartment and she’s broke. None of these things are bad, but they aren’t what you see on the internet, or in magazines. Everything looks perfect on there, but I can assure you, it.is.not. And that’s ok, because no one is perfect. That’s a fact, and you can quote me on that.

So you do you, boo. Be weird, be crazy, be broke, be stylish, be lazy. Be everything that you are, that makes you who you are. Keep improving, keep striving, and keep navigating your way through adulthood. We’ll all figure it out someday, someway, and at our own pace. But for now, let’s figure out where the heck to start. And let's do it together.

So, let's get this helpful thing started. Tell me your #1 challenge right now, and I'll do my best to give advice, help you out, or create a blog post about it. Is it something simple, like how to refinish your dresser? Something harder, like how to update your wardrobe on a budget? Or something really tough, like how to move forward when your mind is filled with doubts? Let me know in the comments below, or contact me.

I can't wait to go on this journey with you!

In a world of photoshop, social media, and unrealistic expectations, it can be hard to feel like you're good enough. Click to learn how a particularly bad day helped me find myself- and how you can too!

Gift Guide for the Barbie Girl

Are you a Barbie girl, in the normal world? It's a pretty dull place to be, when your head is full of dreams for pink homes, great fashion, and trendy accessories. Alas, there is a way to bring your Barbie World love back into the normal world. And that's by grabbing as many pink items as you can!

Make your life a little more Barbie Pink with these awesome items! You’ve got barbie shoes, pet care, and even closet organization! We could all use a little more glam in our lives. #barbieshoes #barbieclothes #shoppinglists

1. Sneakers 2. Makeup Brushes 3. Barbie Necklace 4. Barbie Backpack 5. Pink Sunglasses 6. Barbie Purse 7. Pink VW Beatle 8. Lip Stickers 9. Dog Bone Bowls 10. Pink Glitter 11. Dog House 12. Fling Tumbler 13. Bow Heels 14. Pink Planner 15. Heart Hangers

Sneakers- We all know Barbie loved her shoes. Unfortunately, she usually did it Cinderella-style, because we somehow managed to lose one them. With these sneakers, it's almost as if you found those missing doll shoes. Plus, this counts as wearing heels, right?

Makeup Brushes- Barbie wore a lot of makeup over the years. With these brushes, you can have that flawless look too! They’re perfecting for trying out the newest trends. I don't know how well they work, but they sure are pretty! 

Barbie Necklace- Since nameplates and Barbie were all the rage when I was younger, this seems like the best of both worlds. Wear it when you need a pop of color, to show your affiliation with the Barbie brand, or to convince creepy bar guys that your name really is Barbie.

Barbie Backpack- A teeny pink Barbie backpack to hold all your cool essentials. I remember the days when tiny backpacks were the “in” thing. They need to make a comeback! We don't need half the things we carry in our oversized purses. Who do I talk to about this?!

Pink Sunglasses- These sunglasses are so ridiculous to me because they really remind me of the cheap plastic sunglasses that came with Barbies in the 2000’s, and I love it. I had several pairs of sunglasses with funky colored lenses, and I wore them until they weren’t cool anymore. Ah, the good old days.

Barbie Purse- for those of you that aren't willing to embrace the tiny backpack trend, try this purse! It’ll hold all your essentials, and then some. It’s got a girly shape and sporty stripes, so it’ll match with any outfit, plus it adds a pop of color!

VW Beatle- I think Barbie cemented our tweenage desire to own a VW beetle. This car was THE car to own back in the days. Now you can commemorate it and enjoy the beetle without, you know, having to drive it everywhere. 

Lip Stickers- Barbie is known for her iconic pink lips, and now you can be, too! Just place these stickers on everything and everyone you interact with and they'll be sure to remember you. 

Dog Bone Bowls- What else would your purse pooch eat from? This has one bowl for food, one for water, and one very cute bone-shaped tray to keep your floors clean. Because although Princess is adorable, she’s pretty sloppy sometimes.

Pink Glitter- Everything is better when it's covered in pink glitter. That is a fact! Use this pink glitter to add a little sparkle to note cards, tea light holders, and just about anything, really.

Dog House- Barbie has had lots of pets in her lifetime, but I imagine her favorite must have been some sort of small puppy. With this, your pampered pooch can have her own Barbie Dream House. Dream car not included.

Fling Tumbler- since Barbie is getting married to Ken every few years, I bet she would love this tumbler. She puts the Kardashians to shame with the sheer quantity of weddings she’s had. Oh Barbie… never a bridesmaid, always a bride.

Bow Heels- Barbie loves her heels, and so do we! They’re pink and have a bow, which is all you need in my book. Plus they’re Kate Spade! I mean, if Barbie could walk in heels with her disproportionate body, you can too, right?

Pink Planner- This planner is perfect for jotting down all your hopes and dreams, like Barbie and her very many career paths. I feel like if Barbie taught us anything it’s that you can have any job you set your mind to, and look damn good doing it!

Heart Hangers- These hangers are amazing because they remind me of some doll ones that I had way back in the day. Barbie would clearly hang her clothes on these! It might be a little much to get a whole closet full of these (or not) but I think hanging your party clothes on it would be a perfect use for them.

So which one of these items do you like the best? Do you have any items you own that stem from your Barbie collection? Let me know in the comments below!

Painted Corkboard and Barbie Push Pins

I have a sliiight obsession with desk items. I've got a whole bunch of pens, some cute tape dispensers, and even a cute felt cactus on my desk. Hoarder is one word that can be used to describe me, but I prefer collector. Luckily the differentiator between a hoarder and a collector is how your items are presented and stored. As long as it's neat, there's nothing to worry about, right? 

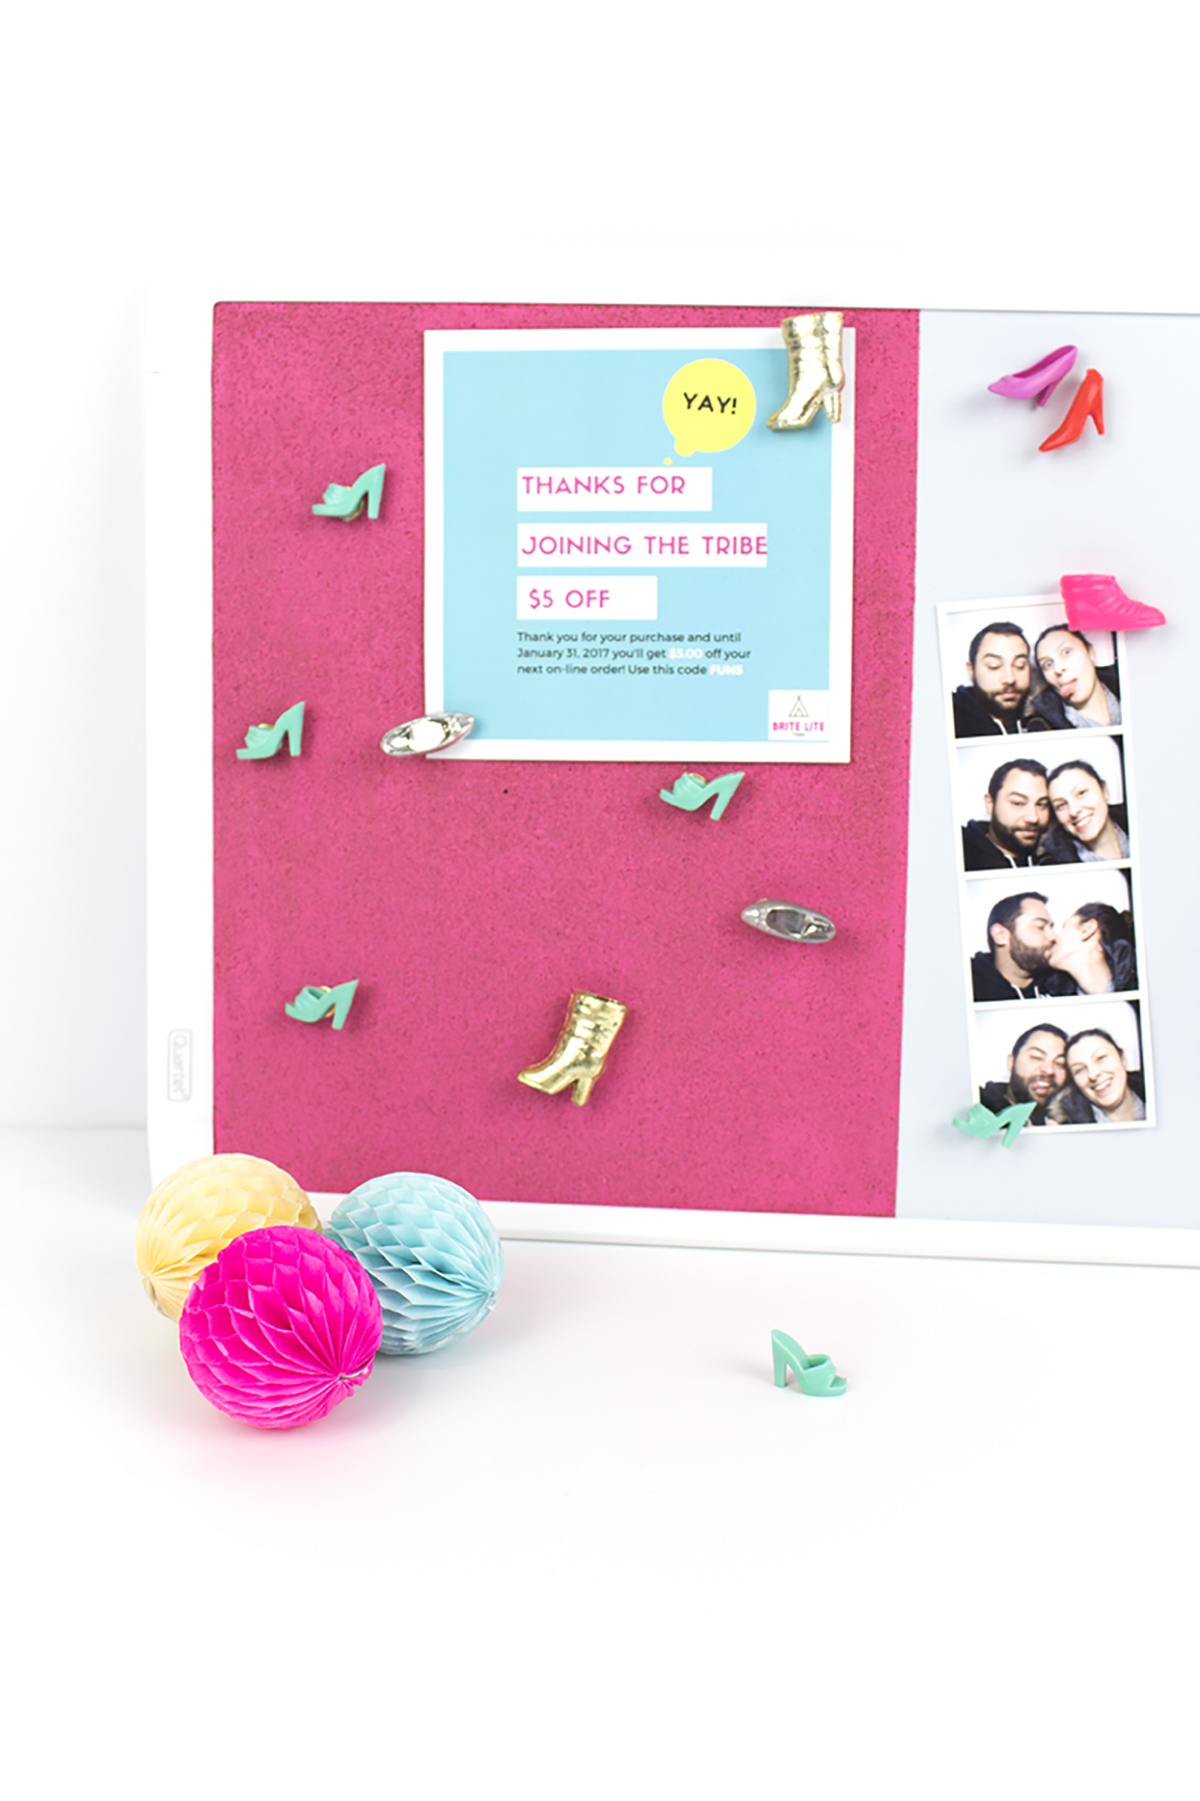
I tend to hold onto papers and fortune cookie fortunes that are all too relatable, so I needed somewhere to keep them where I could actually see and use them. In addition, I wanted to have it be something really fun! In what is one of my easiest tutorials to date, I'll show you how to make your very own painted cork board and Barbie push pins!

I decided to use my slight obsession with Barbie to create this awesome pink cork board with matching Barbie shoe magnets and thumbtacks. Click for the full tutorial! #deskorganization #barbieclothes #corkboardideas
I decided to use my slight obsession with Barbie to create this awesome pink cork board with matching Barbie shoe magnets and thumbtacks. Click for the full tutorial!

You will need:

Corkboard/magnetic whiteboard combo (here)
Small magnets (here)
thumbtacks (I used gold, but these are nice too!)
E6000 glue (here)
pink paint
toothpick
painters tape (here)
Barbie Shoes (authentic vintage ones from Ebay, or similar here)

Directions:

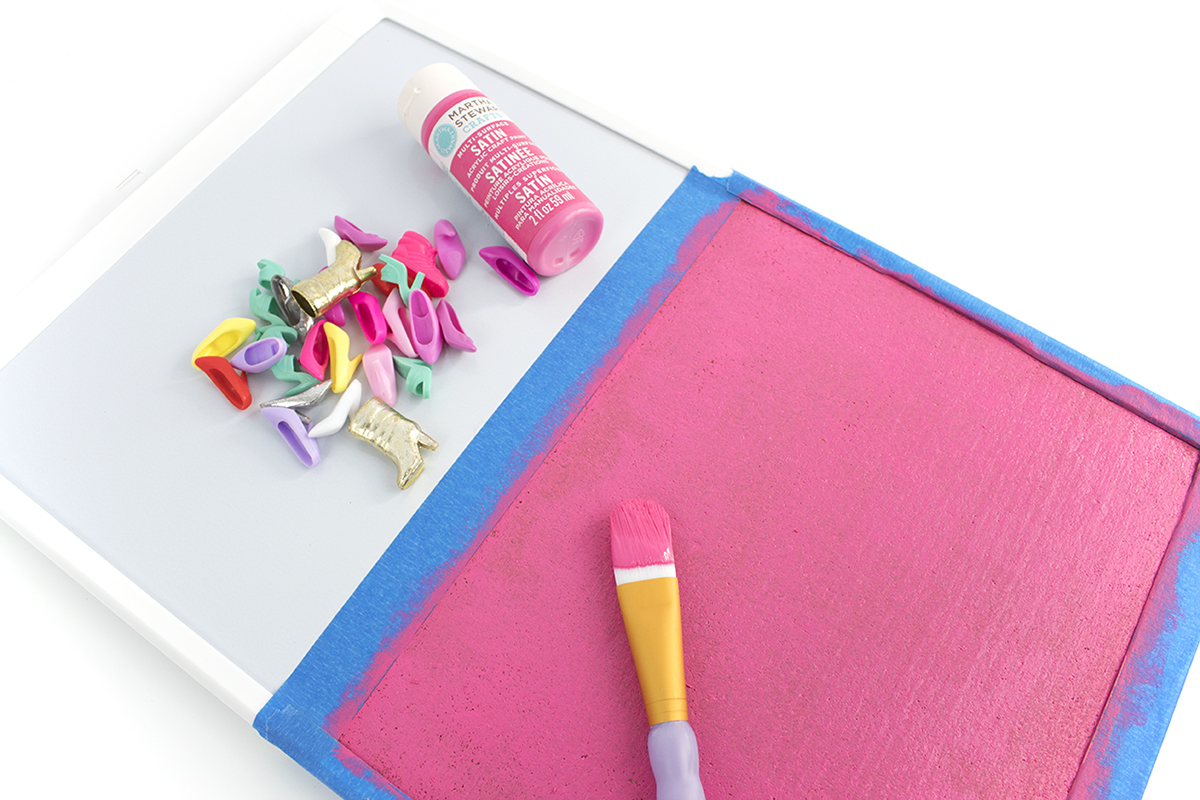
1. Tape off the sides of the corkboard.

I decided to use my slight obsession with Barbie to create this awesome pink cork board with matching Barbie shoe magnets and thumbtacks. Click for the full tutorial!

2. Paint the corkboard pink. I used Martha Stewart Satin Paint in Pink Dahlia.

I decided to use my slight obsession with Barbie to create this awesome pink cork board with matching Barbie shoe magnets and thumbtacks. Click for the full tutorial!

4. Peel off the tape while the paint is still kinda wet. Touch up the paint and use a toothpick to remove any extra paint from sides.

I decided to use my slight obsession with Barbie to create this awesome pink cork board with matching Barbie shoe magnets and thumbtacks. Click for the full tutorial!

5. Space out your magnets on the whiteboard and place a small glob of glue on each. Let cure for 2 minutes (or according to instructions) then place the shoe onto it. Hold for 30 seconds, then let dry for 24-48 hours. Please note that not all whiteboards are magnetic, so make sure you find one that is!

I decided to use my slight obsession with Barbie to create this awesome pink cork board with matching Barbie shoe magnets and thumbtacks. Click for the full tutorial!

 I did the opposite for all the thumbtacks, putting a small glob of glue onto the shoe itself, then placing a thumbtack on after it cured. Hold for 30 seconds, then let dry for 24-48 hours.

I decided to use my slight obsession with Barbie to create this awesome pink cork board with matching Barbie shoe magnets and thumbtacks. Click for the full tutorial!

Now, gather up all your cutest photos and postcards, and hang them up!

I decided to use my slight obsession with Barbie to create this awesome pink cork board with matching Barbie shoe magnets and thumbtacks. Click for the full tutorial! #deskorganization #barbieclothes #corkboardideas

You can also scribble notes on your whiteboard, like dinner dates and brunches with friends!

If you want more Barbie fun, be sure to check out my Barbie Shoes Tote Bag and Gift Guide for the Barbie Girl!

I decided to use my slight obsession with Barbie to create this awesome pink cork board with matching Barbie shoe magnets and thumbtacks. Click for the full tutorial! #deskorganization #barbieclothes #corkboardideas

I know I'm way too old for this, but I still really love Barbies. I peruse the doll aisle at Target every once in a while to see what they have. This cork board is a fun and nostalgic way to show off your Barbie love. So what do you think, will you be making one of these for your desk? Did you love Barbies as a kid, or were you over her faster than you can say "Barbie Dream House"? Do you still have a soft spot for her? Let me know in the comments below!