DIY Cloud Costume

Ok guys.... if you don't have a costume yet, you better get cracking! Lucky for you, I have some really easy last minute costumes coming your way. And, they feature something we all have in our closets- a T-shirt!! Let's start off with that spare baby blue tee way in the back of your drawers.

First, a backstory. When I was a kid, I had this blue cloud dress (with a matching sheer shrug thing like all the dresses had) and I loved it. Well, imagine my delight when I found a matching pair of sandals with a cloud print on them too! You can bet that I wore those two together, because clearly it matched so well. In case you're new around here, I clearly love a theme... Anyway, this cloud costume is just a touch classier than that, topped off with a ridiculously bright and bouncy sun balloon. 

Looking for a quick and easy Halloween costume? Look no further! This last-minute cloud costume is made from a staple everyone has in their closet- a t-shirt! Click for the easy DIY. #halloweencostume #diycostume #lastminutecostume

You will need:

Shirt:

Blue t-shirt (similar here)
White fabric paint (here)
Cotton balls (here)
Cardboard
 

Earrings: 

Earring hooks (or an old pair of dangly earrings) (here)
Thin cardstock (like a manilla folder or notebook cover)
Cotton balls (here)
Small pliers (here)
Glue gun (similar here)
Heart punch (similar here)
 

Headband:

Yellow balloon (similar here)
Balloon pump (similar here)
Yellow glitter cardstock (similar here)
Headband (similar here)
Scissors (here)
Glue gun (similar here)


Looking for a quick and easy Halloween costume? Look no further! This last-minute cloud costume is made from a staple everyone has in their closet- a t-shirt! Click for the easy DIY. #halloweencostume #diycostume #lastminutecostume


Directions:

T-Shirt

Looking for a quick and easy Halloween costume? Look no further! This last-minute cloud costume is made from a staple everyone has in their closet- a t-shirt! Click for the easy DIY.
  1. Place a piece of cardboard inside the shirt to prevent the paint from leaking through. Try to find a smooth piece, otherwise you'll end up with some weird textured stripes like mine had.

  2. Paint clouds onto your shirt using a dotter or a cotton ball. I found that the cotton ball made it more "pillowy". I used a dotter for the pocket cloud and a cotton ball for pretty much all the rest.

  3. Let dry, according to directions, then set the paint if the instructions calls for it. Mine advised ironing your shirt, but yours may be different.

Earrings

Looking for a quick and easy Halloween costume? Look no further! This last-minute cloud costume is made from a staple everyone has in their closet- a t-shirt! Click for the easy DIY.
  1. Draw or punch a heart shape onto your cardstock or thin cardboard. You can probably use any shape, but that was the punch I had handy. A simple circle would probably work too.

  2. Using your pushpin, make a tiny hole at the tip of your heart shape. (Love these Barbie shoe pushpins? Get the DIY here)

  3. Attach your earring hook onto the cardstock. If you're using an old pair or earrings, remove the hook and the first jump ring. Slide it through the hole, then be sure to clamp it closed so it's securely fastened.

  4. Break up your cotton ball into tiny pieces. Try to keep them round and billowy.

  5. Glue your mini cotton balls onto both sides of the cloud. The cotton balls are super light, so don't worry- they won't be too heavy!

Looking for a quick and easy Halloween costume? Look no further! This last-minute cloud costume is made from a staple everyone has in their closet- a t-shirt! Click for the easy DIY. #halloweencostume #diycostume #lastminutecostume

Headband:

*note: make this headband just before you're going to wear it. Mine started deflating within a day. You can always open it up and re-inflate it though! 

Looking for a quick and easy Halloween costume? Look no further! This last-minute cloud costume is made from a staple everyone has in their closet- a t-shirt! Click for the easy DIY.
  1. Blow up your mini balloon so that it's not overinflated. You want it to be nice and round.

  2. Cut triangles of various sizes out of your cardstock. I made a template with a large triangle and cut out 3 of those. Then, I made 2 smaller sizes by moving the template slightly off the page to make the triangles smaller.

  3. Glue your cardstock to your balloon. You'll want to place the glue on the cardstock, not the balloon itself. We don't want it to pop!

  4. Put some glue on the part where you blew it up, and fold the knot inside to keep it as flat as possible.

  5. Place some glue on your headband and attach the sun. Hold it in place until it cools.

Looking for a quick and easy Halloween costume? Look no further! This last-minute cloud costume is made from a staple everyone has in their closet- a t-shirt! Click for the easy DIY. #halloweencostume #diycostume #lastminutecostume

Then, all you have to do is put on all these pieces with a pair of white or light blue jeans, and your costume is complete! I also think a pair of bright & sunny yellow shoes would be the perfect additional, along with this rainbow tassel necklace. Lastly, pop on a pair of sunglasses and you're all ready to go!

Looking for a quick and easy Halloween costume? Look no further! This last-minute cloud costume is made from a staple everyone has in their closet- a t-shirt! Click for the easy DIY. #halloweencostume #diycostume #lastminutecostume

T-shirt: $12
White Fabric Paint: $8
Cotton Balls: $2
Balloons: $3
Yellow Glitter Paper: $2
Headband: $1

Total cost: $28

And that's all folks! An easy DIY costume that you can whip up in time for Halloween :)

Striped Happy Halloween Sign

There's less than 2 weeks until Halloween, guys! This is not a drill!!

For some people, Halloween is a dark, spooky time of year where you get to proudly display your goriest items and scare the daylights out of people. For me, it's a time to be "spooky" by decorating with black, orange, green, purple and pink, with a touch of teal, because why not?  That's right, I'm that group that enjoys the cutesy side of Halloween- eating candy, dressing up in cute (and slightly sexy) costumes, and carving pumpkins. If you fall into that second group with me, you're going to LOVE this one!

Looking for a slightly creepy, slightly cute way to decorate for Halloween? You've got to see this striped sign! Click for the full DIY. #halloweencrafts #halloweenart #diyhalloween

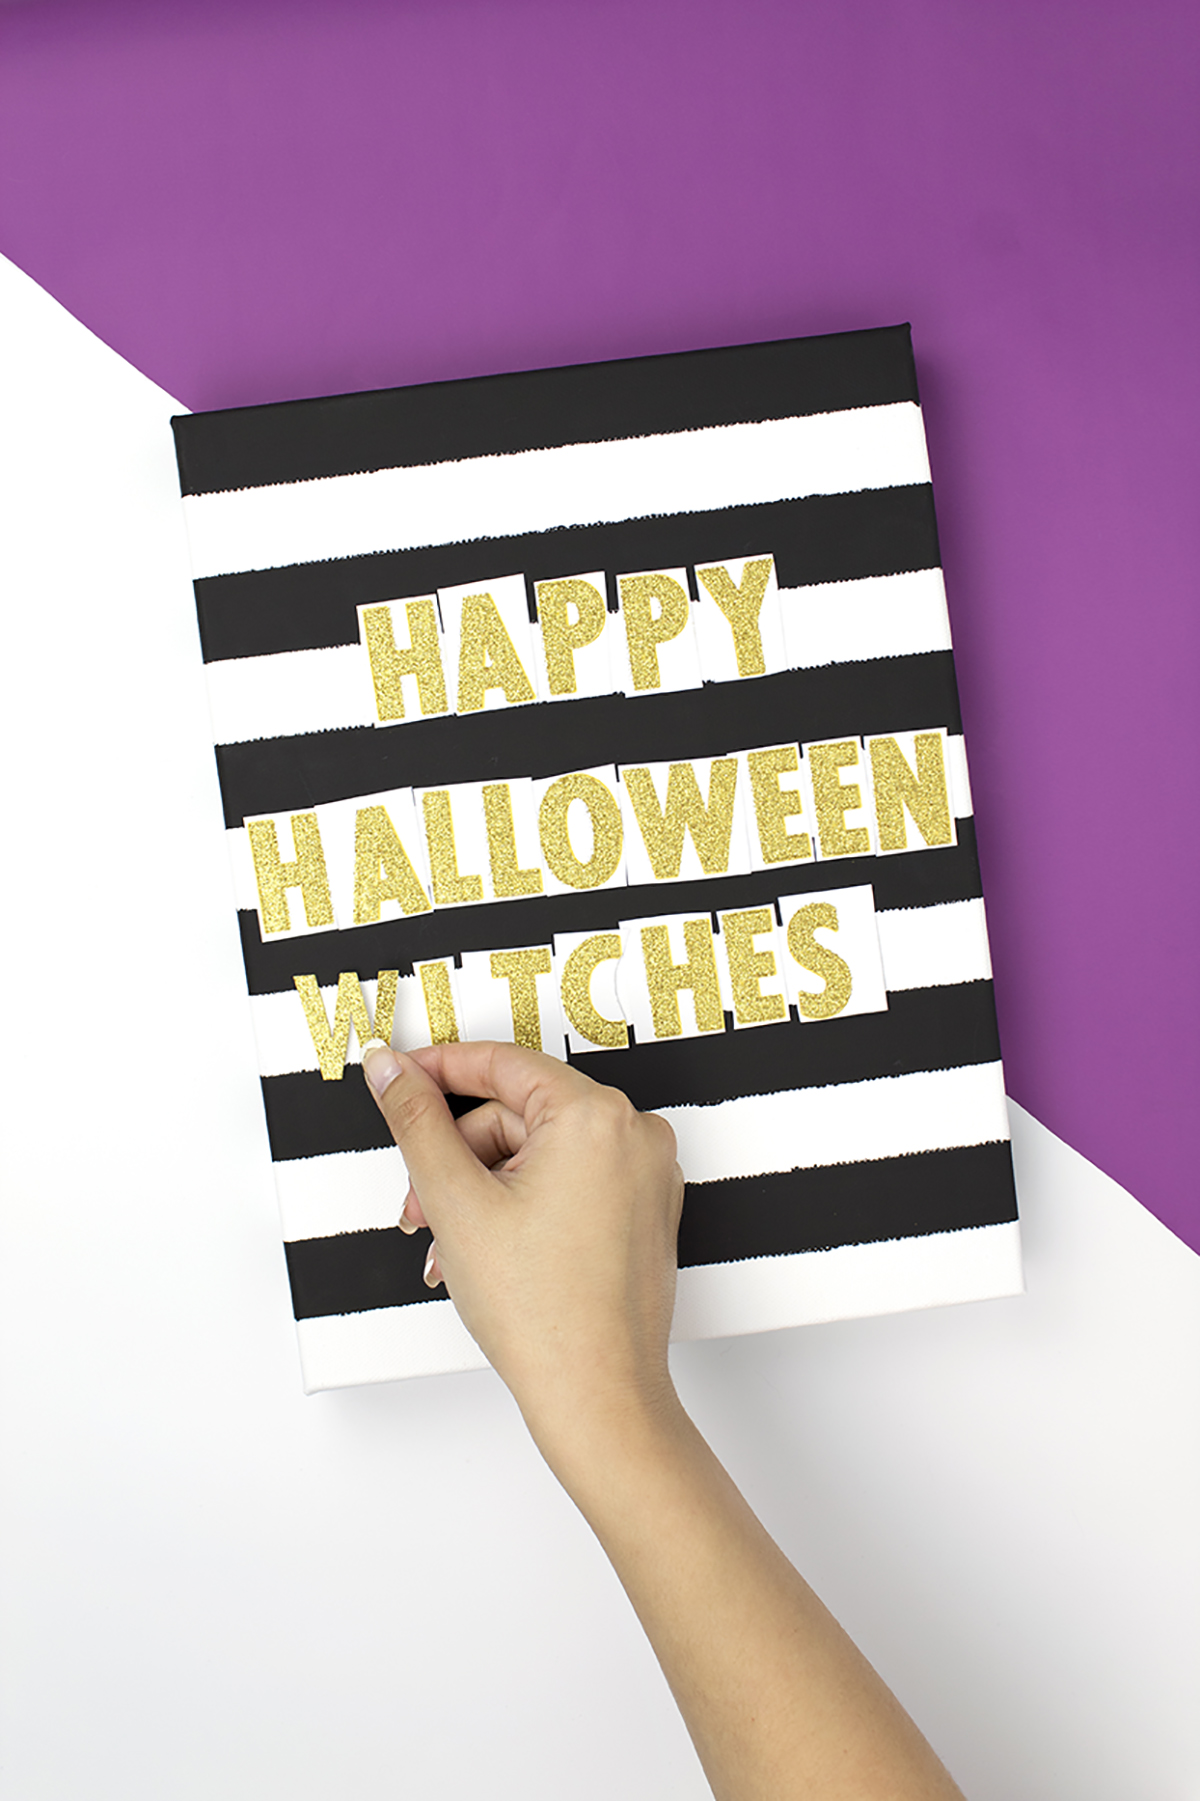
I created this Striped Happy Halloween Sign for Giggles Galore and it's one of the easiest projects so far!  All you need for this DIY is a canvas, blue painter's tape, some black paint, and gold letters. It really pops in an entryway, and brings some fun, light-hearted humor to your home!

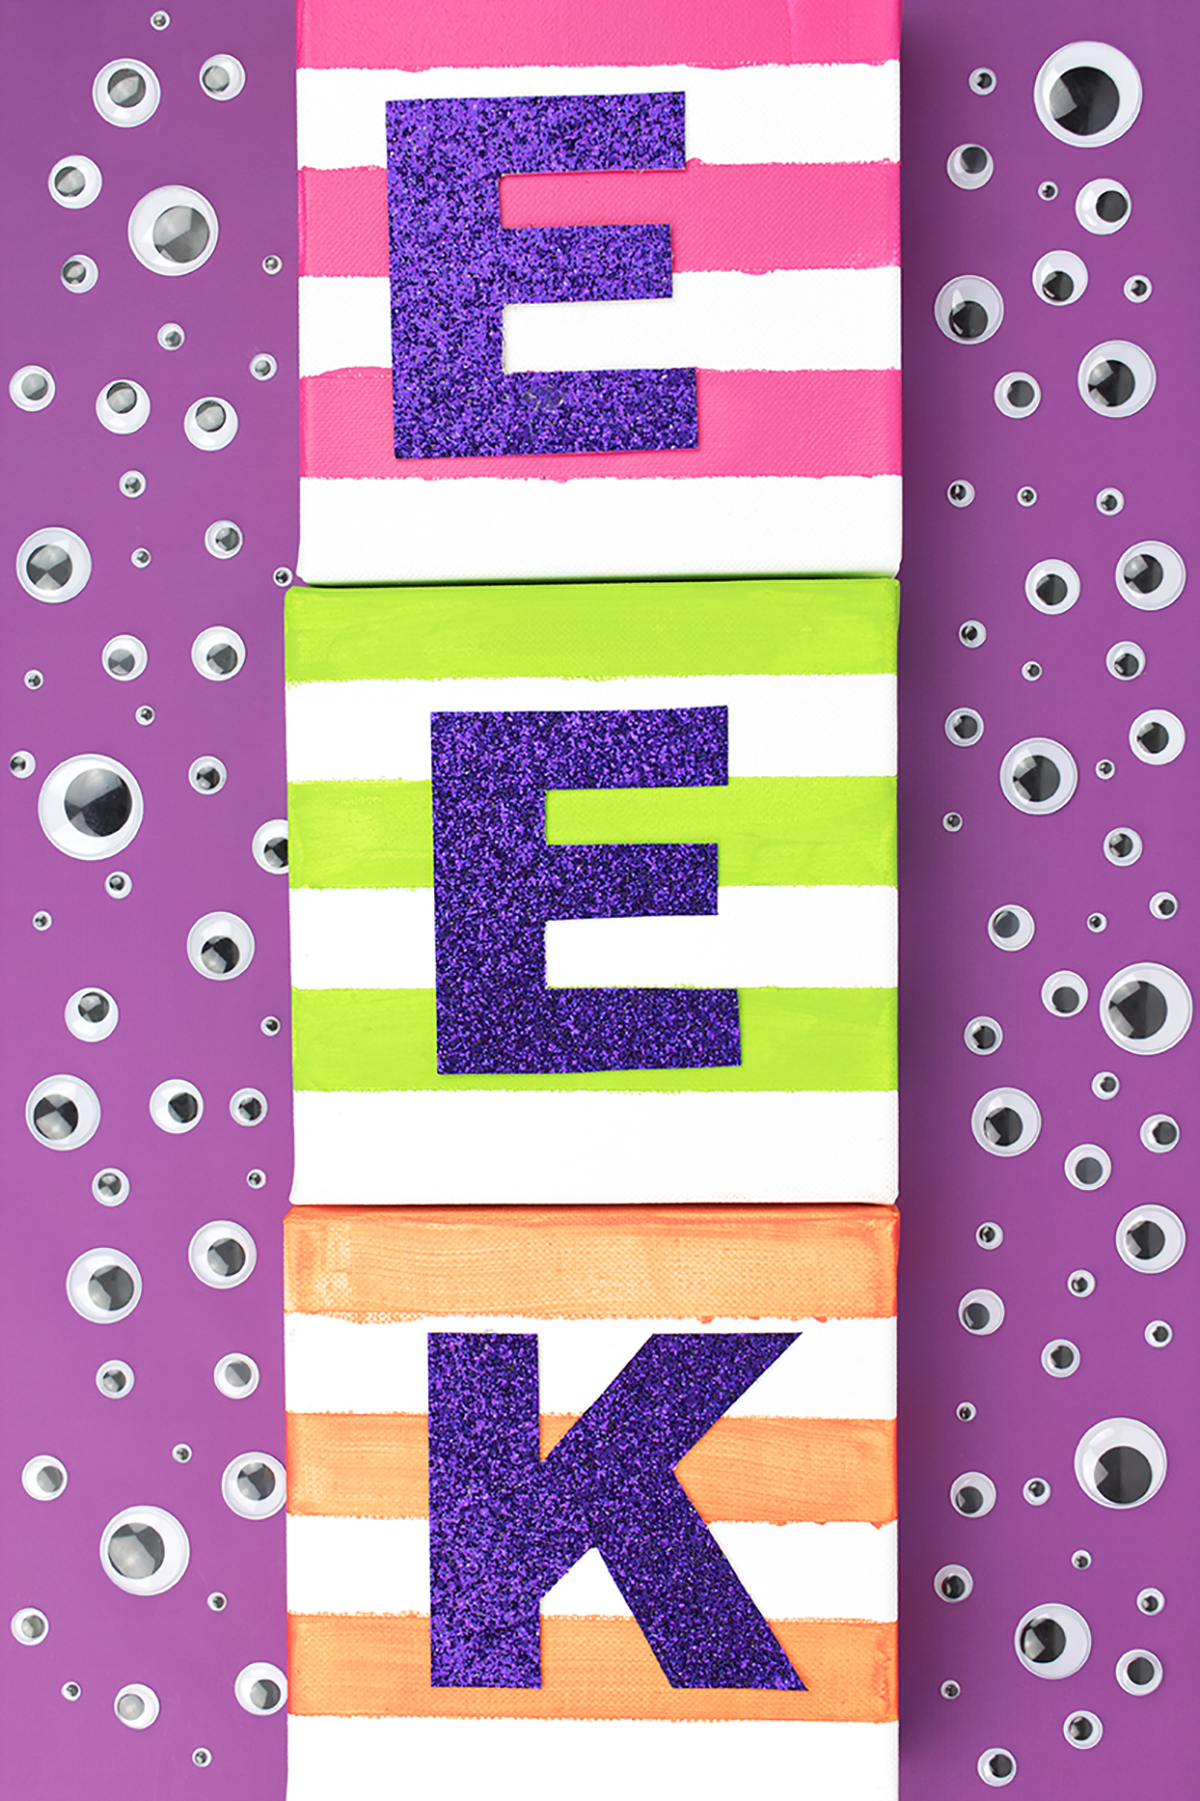
Head on over to Giggles Galore to see the full post! And, if your canvas needs a friend, try these EEK canvases too!

Looking for a slightly creepy, slightly cute way to decorate for Halloween? You've got to see this striped sign! Click for the full DIY. #halloweencrafts #halloweenart #diyhalloween

I hope you enjoyed this easy canvas DIY! Now, time for my question of the day that no one answers- what's your favorite part about Halloween? Is it dressing up, eating candy, scaring people, or staying home and hiding from everyone? Don't be shy! Let me know in the comments below.

Welcome to Party HarDIY!

Oh hey... We're Moving! Well, the blog is. 

PHD launch3.jpg

I'm so excited to announce that WellKeptChaos is now Party HarDIY. 

Why Party HarDIY?

The name came about when I was looking for a fun email sign-off. I wanted it to be silly and party related, so I came up with Party HarDIY. I suddenly realized that this name stood for exactly what my blog was about- party ideas, DIY projects, and being a little bit cheesy. Ok, very cheesy. I got really excited, with visions of sugarplums dancing in my head. I realized this was the perrrrrfect name for my silly little blog, and that I had to make the change. Well, after some deliberation, I finally decided to bite the bullet and get that done. 

The Good News:

The content is going to stay the same. You'll still get awesome party ideas and DIY projects that you LOVE.

Oh, and I'm still here. That's right, your favorite hostess is still going to be here, yapping about DIY's, giving advice, and throwing amazing parties. I'll also still be offering my virtual party planning services so that your parties can be as stellar as you are.

Catherine 3.jpg

What's Changing:

Well, for starters, our logo in the corner is different, and soon our URL will be too. I'm still working out the best way to make the switch, so if you have any advice, send it over my way!

My social media channels made the switch today! You can now find us @PartyHarDIY on all the social media channels- Instagram, Twitter, Facebook and Pinterest. Be sure to follow us!

Oh, and my name changed too! I just got married in September, so Catherine Sarlis has become Catherine Cardona. 

New Stuff:

As if all this wasn't enough, there's a few new things coming up the pipeline!

For starters... I'm opening up a shop. That's right, soon you'll be able to purchase your very own PartyHarDIY goodies!! The exact details will have to stay a secret for now (darn!) but I promise it's gonna be really good. You don't want to miss out, so join the wait list, and you'll be the very first to know what's going down! 

School's out for summer.... but soon it'll be back in session! I'm creating some e-courses to teach you about a few different topics. I always imagined I'd become a teacher when I was a kid, so it's only fitting that I start teaching classes!  Soon enough, you'll be able to get a PHD all your own (get it... PartyHarDIY?). 

I'll definitely keep you guys updated as all the changes happen, but I'm so excited/relieved to reveal this secret that I've been hiding for a while now! I'm so excited to see the new direction of the blog, and I hope you all continue to follow along!

Iā€™f youā€™re looking to improve your photos, I have a FREE photography course! Just click the photo to sign up.

Easy Striped Halloween Art

It's FALL!!! Halloween is almost here!!! YAYYYY!

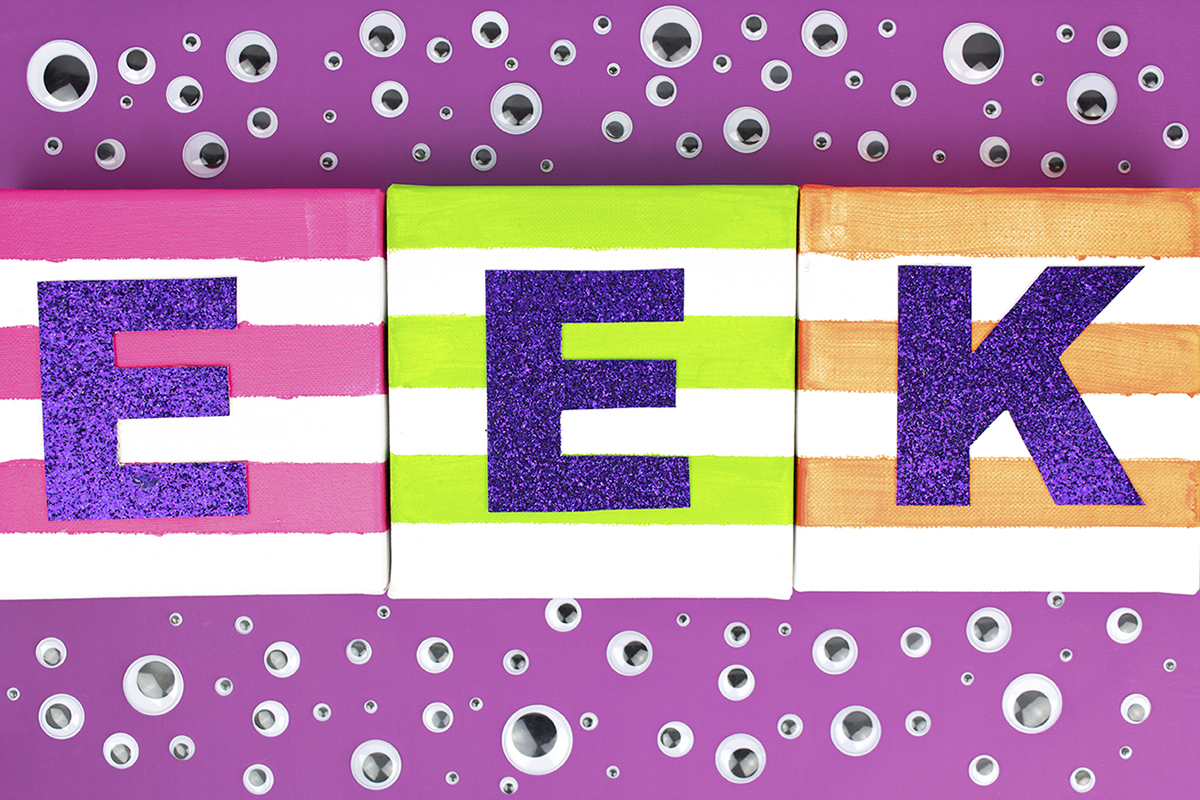
Ok, I think I'm a little bit too excited about Halloween, but I just can't help it. Halloween is one of my favorite holidays, and fall is my favorite season! This week, I whipped out my Halloween decorations, and started to decorate. While I love the traditional black and orange, I wanted something with a little more color to add a pop to my usual Halloween decor. Lucky for me, I knew just what to do! And lucky for you, I made a DIY for ya ;)

While I love the traditional black and orange, I wanted something with a little more color to add a pop to my usual Halloween decor. Click to check out the easy DIY! #halloweenart #diyhalloween #halloweencrafts

You will need:

While I love the traditional black and orange, I wanted something with a little more color to add a pop to my usual Halloween decor. Click to check out the easy DIY! #halloweenart #diyhalloween #halloweencrafts

Square canvas (here)
Glitter Paper (from the craft store, similar here)
X-Acto Knife (here)
1" Painter's Tape (here)
T-Square or Ruler (here)
Neon Paint (similar here)
Scissors (here)
Pencil
Paint Brush

How to:

While I love the traditional black and orange, I wanted something with a little more color to add a pop to my usual Halloween decor. Click to check out the easy DIY! #halloweenart #diyhalloween #halloweencrafts

1. Using your T-Square or ruler, make lines going across the sides of your canvas at every inch. Flip it, and make lines on the other side. We are doing this so that we know where our tape needs to go without making lines on the front. We want our lines to be as straight as possible!

2. Add your tape, starting at one end, wrapping across the front, and lining up on the other side. Press it down so the paint doesn't sneak in like mine did ;)

3. Paint your canvas, making sure to get the sides too. I found the neon paint to be a bit thin, so I did a few coats. 

4. When your paint is dry, peel off the tape .

4. Create large letters on your computer and print. I did EEK because it would be easier to cut out, but you can do anything! I cut out my printed letters, traced them onto the glitter paper (BACKWARDS!) and then cut them out using scissors, and an X-Acto knife for the smaller parts. I use this cutting mat to protect my work surface and love it! 

While I love the traditional black and orange, I wanted something with a little more color to add a pop to my usual Halloween decor. Click to check out the easy DIY! #halloweenart #diyhalloween #halloweencrafts

5. Hot glue your letters onto your canvas. You'll want to make marks so it's centered, by making a very faint line on the canvas and then gluing the letter right on top.

While I love the traditional black and orange, I wanted something with a little more color to add a pop to my usual Halloween decor. Click to check out the easy DIY! #halloweenart #diyhalloween #halloweencrafts

"Eye" hope you liked this post! If you're not into the whole neon Halloween thing, you can definitely change it up to the classic black and orange. Or, if Halloween isn't your thing at all, you can make one of these and use it as a monogram decor in your home! The possibilities are endless. You can make these for every holiday! Especially if you get the canvases on sale with a coupon from Michael's (which is what I did!)

While I love the traditional black and orange, I wanted something with a little more color to add a pop to my usual Halloween decor. Click to check out the easy DIY! #halloweenart #diyhalloween #halloweencrafts

What's your favorite color combo for Halloween? Do you like to keep it classic? Try new things? Hate Halloween in general? Let me know in the comments below!

Colorful Fall Pumpkin Wreath

Hey everyone! I'm back from my wedding and honeymoon, and suddenly it's fall. I mean, it feels like summer but the trees are changing colors, the kids are back in school, and I'm already working on my Halloween costume. 

In order to celebrate this weird Summer-Fall hybrid, I crafted a colorful pumpkin wreath to bridge the gap between the seasons. It's got a few of my favorite things- bright colors, pumpkins, and POM POMS!! It's a little kooky, but all the best people are ;)

You can find the full blog post over on Giggles Galore, so be sure to head over there and take a look!

In order to celebrate this weird Summer-Fall hybrid, I crafted a colorful pumpkin wreath to bridge the gap between the seasons. It's got a few of my favorite things- bright colors, pumpkins, and POM POMS!! It's a little kooky, but all the best peoplā€¦

I used the spray painted pumpkins from my Glam Friendsgiving Party as inspiration for this wreath. I loved having some fun pumpkins around my house last year, so I wanted to create something that would show them off to everyone that passed by.

In order to celebrate this weird Summer-Fall hybrid, I crafted a colorful pumpkin wreath to bridge the gap between the seasons. It's got a few of my favorite things- bright colors, pumpkins, and POM POMS!! It's a little kooky, but all the best peoplā€¦

I love how gorgeous and bright these pumpkins are! While I love traditional holiday colors, I also think it's really fun to break the mold and try to capture the spirit of the season with a completely different color palette.

In order to celebrate this weird Summer-Fall hybrid, I crafted a colorful pumpkin wreath to bridge the gap between the seasons. It's got a few of my favorite things- bright colors, pumpkins, and POM POMS!! It's a little kooky, but all the best peoplā€¦

Be sure to head on over to Giggles Galore for the full tutorial!