We're Having a Baby!

Omg you guys, we are having a baby!! 

John and I have been talking about having a kid forever, but we wanted to wait until after the wedding. We had only been trying since about November but for some reason, ever since I was in high school, I thought I would have trouble conceiving. I have a few minor medical issues, but for some reason I had convinced myself that getting pregnant would be really hard, if not impossible. I’ve literally cried at the thought of not being able to get pregnant. I don’t know why I felt this so strongly, but I did. So imagine my surprise that after only a few months of trying, we got pregnant! It’s truly a blessing and something that I know I am so lucky to experience. Although I may have complained about being tired or nauseated, I know this is truly the most amazing gift anyone could ever give me and I am so happy to experience it. 

*This post contains affiliate links

We're having a baby! And we are so stinking excited about it. Read more about our pregnancy announcement and photoshoot by clicking the photo!

Sources: baby onesie from Colorado souvenir shop (baby's first trip!), similar train, pink board, blocks, honeycombs

Finding out:

I was at work and wasn’t feeling 100%. Two of my coworkers that I’m friends with started looking at me funny. “I don’t knoooooow, maybe you’re pregnant!” Well, I knew I wasn’t. After all, I had bought ovulation strips and they told me I was not ovulating. So although we tried, I knew I hadn’t been ovulating when we did. They teased me about it so much that week that I figured I may as well take the test the next day. 

We're having a baby! And we are so stinking excited about it. Read more about our pregnancy announcement and photoshoot by clicking the photo!

All night I had dreams about taking the pregnancy test.  I was so nervous that I would forget to take it that it seeped into my subconscious and my dreams. There was never a result- just me in about 5 different dream scenarios with a pregnancy test. I woke up at my usual 5am that day, right after John had left for work. I went to the bathroom, plonked down on the toilet, and peed on the stick. I put it on the counter and watched it flow through to do its magic. One pink line. Yep, as I suspected. Then I look over again and a SECOND PINK LINE APPEARED. I was in disbelief and kept saying, out loud, “is that a second line?” I was tired (it was 5am after all!) and kept blinking and making sure I was really awake. I was. And I started to cry SO HARD. I recorded a video for John so he could see my reaction, since he wouldn’t be home for hours and I didn’t know how I’d be when I told him. The video wasn’t pretty, but it really captured my emotions. Snotty tears, shaking hand and all. 

I literally spent the rest of the day crying tears of joy while waiting for John to come home. 

We're having a baby! And we are so stinking excited about it. Read more about our pregnancy announcement and photoshoot by clicking the photo!

Telling John:

I already knew how I wanted to tell John, so I did a second pregnancy test juuuust to make sure before telling him. I went to CVS and got a digital test this time, peed on the stick, and waited for 3 of the longest minutes of my life. I was so nervous that it was a false positive or something! When I finally saw the “YES+” indicating that I was pregnant, I started crying all over again. And recorded a second video for John. 

John came home hours later, since he had to work overtime. I tried to get him home earlier, but I didn’t want to tip him off. He didn’t even know I was taking the test! I brought him up to our room, and sat on the bed. I pulled a small Mets onesie out of my drawer and showed it to him. He looked at me confused, like “ok...?” I realized at this moment that I’m so crazy that my husband thinks I would buy a onesie without actually having a baby to wear it. Anyway, I pulled out the pregnancy test and he’s still confused so I told him I’m pregnant. Then I start crying (again) and say “we’re having a baby!!” He’s literally in shock and just home from work, not expecting this at all. So he says something like “are you pranking me?” And I’m still crying and saying no. It was like our engagement all over again! Obviously he was so happy, although cautiously so- he wanted to make sure it wasn’t a false positive. He soon realized my symptoms definitely confirmed it- I was pregnant! 

We're having a baby! And we are so stinking excited about it. Read more about our pregnancy announcement and photoshoot by clicking the photo!

The first exam:

We had to wait 2 long weeks before we could go to the doctor to get my first sonogram. I was so nervous the whole time. What if something was wrong, or what if I had an ectopic pregnancy? I knew 3 people that had gone through that, and it was both saddening and risky. I was hoping everything was ok. We went into the sonogram room and the tech inserted the camera and moved it around. Lo and behold, there was our baby! She showed us the heartbeat and I started to cry because everything was ok. It was such an amazing experience to see. 

We're having a baby! And we are so stinking excited about it. Read more about our pregnancy announcement and photoshoot by clicking the photo!

Telling our family:

We decided to wait until after the first doctors visit and sonogram to tell our families. We wanted to make sure everything was ok before we did. We bought everyone a frame and made copies of the sonogram. John’s mom is a huge Mets fan, so she got this Mets frame. My parents are cornballs, and amazing parents, so they got this grandparents frame. And my sister likes to keep it simple, so I gave her this plain frame. We invited them over for lunch and gave it to them as a “Valentine’s gift” so they wouldn’t suspect anything. I wanted to tell my sister separately first, so I brought her up to my bedroom. She opened the gift and got so excited she was jumping up and down! And I’m there shushing her so the parents don’t hear! We go downstairs and give the other gifts to my parents and John’s mom and tell them to open them at the same time. John’s mom suspected, so when she opened it she started to cry. My parents are oblivious so they’re opening the gift, confused, and wondering what John’s mom got that she’s crying so much. They finally figured it out too, and they were so excited! We told John’s siblings as well, and they were both really happy. 

We're having a baby! And we are so stinking excited about it. Read more about our pregnancy announcement and photoshoot by clicking the photo!

About the Photoshoot:

I have to give my sister a special shout-out. She did the whole shoot for us! I'm very picky and the poor girl tried to make sure everything was well-framed haha. We started with the baby food shoot, which was so gross. John refused to take another bite of his beef and beef broth. He said it was like eating dog food, and swore our baby won't be eating that. Also, can we talk about how big my belly already is?! I'm wearing maternity jeans, and it was becoming impossible to hide at work. It's not so obvious from the front but as soon as I turn sideways, you can see it! I'm so happy about my growing baby bump.

We're having a baby! And we are so stinking excited about it. Read more about our pregnancy announcement and baby food photoshoot by clicking the photo!

Ahhh! We are beyond excited about our little bundle of joy coming in September. I'll be doing some fun baby-related blog posts in the next few months, including maternity clothes, nursery, and a gender reveal! We won't know until Mid-May, so we are anxiously awaiting that appointment. If you have any maternity advice, I want to know! It's been hard not being able to share the news and get advice. I'm so relieved that the cat's out of the bag now!

My Favorite Photography Items for Beginners

One of my favorite parts about blogging has become photography. I love seeing my DIY ideas come to life through my tutorials. I imagine people seeing the photo on Pinterest or Instagram, getting that excited feeling in their chest, and excitedly clicking on the link to see more. I remember the days before I had a blog, going onto Pinterest for hours and browsing all the amazing ideas on there. I also remember wishing I could have my projects on there too. The fact was though, my photos were NOT good enough to be on Pinterest. I'm a bit of a perfectionist, and I didn't want to be up there unless I could be as good as everyone else. I knew my craft ideas were good enough, but my photos were not.

I had a few skills I had learned over the years, including some from an intro to photography summer course in college. We learned a bit about the features of the camera, but we only used auto mode, and were told never to use flash. The class focused on teaching us about the composition of a photo (and what makes a good one) rather than really getting into the nitty gritty of how to use the camera. So while I took some really cool photos in this class, I found that my skills were really only good for taking cool photos outdoors.

When I started working on my blog around April of 2016, I used a few of my basic skills to take my first set of photos. Now, while the photos weren't necessarily bad, they weren't good either! They were dark, unevenly lit, and a bit blurry too. Not exactly the makings of a professional blogger! While they say comparison is the thief of joy, for me it was the catalyst to improve my photos...Right away. I upgraded all my equipment and finally started to see some major changes in my blog photos.  

Since I had a very limited budget for my photography upgrades, I found some decent equipment (mostly on amazon!) and made the most of it. I have to say though, these upgrades, along with new editing skills, took my photography game to a whoooole 'nother level. So, without further adieu, here's what I use (and love) for my blog photography.

Looking to improve your photography? I’ve got my essential items for beginner photographers that are super affordable! #photographytips #photography101 #betterphotography

Backdrop Stand- Since my attic has some lovely sloped walls, I needed something to give the illusion that they were totally normal, flat walls. I decided the easiest and probably cheapest solution was to go with one of these backdrop stands. It's been helpful for so many posts in conjunction with a seamless vinyl backdrop. I used to put it up only when I needed to take pics, but since I have the space, I just keep it up all the time. Sometimes I trip over it (ugh) but it's worth it to have the photo studio ready to go at any moment. This set comes with fabric backdrops, but I use a vinyl one which doesn't have wrinkles. See below for that!

Softbox Lights- In my honest opinion, these have been the most helpful change I made to my photo setup. Before I bought these lights, I couldn't take bright, evenly lit photos no matter how hard I tried. I was rejected from craft sites due to my photos and I didn't understand how I could possibly fix it, until I started using these lights. They are seriously a game changer, and they do fold down pretty small, so they can be stored in a closet or something. If you're serious about photography, I highly recommend getting them and finding a place to store them. I also suggest buying an extra set of bulbs. I accidentally knocked my lamp over and shattered a bulb and couldn't work for a few days while I waited for the replacement!

Seamless Vinyl Backdrop- This seamless vinyl backdrop is perfect for using as a backdrop on photos! I've used it for DIY's with larger items like my Cricut and for photos of myself. It's most useful for party posts, because my studio is in the attic with sloped walls, which don't look fab in photos. 

White Backdrop - for small desktop items, I purchased this small white backdrop. I put it on my desk/folding table to have a crisp white surface for photos. It's easy to clean and reusable, so it's perfect for craft projects. I do recommend covering it if you're doing something really messy though. One time I spilled oil paint on it and the stain couldn't be cleaned. But, for everyday stuff like glue, acrylic paint, or glitter, it's perfect!

Step Stool- If you are taking any kind of overhead photos, please oh PLEASE invest in a small step stool. DO NOT USE A CHAIR. I used a chair at first, whatever, I don't want to go downstairs and get the step stool. However, I did fall down and fractured my toe, and couldn't walk for a month! Then I had a walking cast for another month. Not worth it. Chairs are meant for sitting. So park your butt in your chair and order the step stool :p

Desk/folding table- To take all these photos, you'll need a nice, empty surface. I recommend having a dedicated desk for photos if you have the room. Otherwise, purchase a folding table so that you can have a dedicated surface when you need it, then put it away when you're done. Don't go too cheap with a folding table, because you don't want it to tip sideways or fall over if you accidentally bump it. This folding table is cool because the height adjusts! 

Canon Eos Rebel T6- In December 2016, I switched to this camera and it made a huge difference! This camera packs a lot of bang for your buck and it's a nice size. I didn't have a huge budget, so I use the 18-55mm lens it came with. Somewhere down the line, I hope to get a fancier lens, but this one works just fine for now. I hoarded gift cards for a while to buy this camera! If you've got a gift-giving occasion coming up (Christmas, birthday, graduation) be sure to spread the word that there's a camera you've got your eye on, and that all you really want is some assistance to purchase it! Or, have a family member (like a sibling or husband) suggest Visa/Mastercard gift cards to family members so that you can purchase it. If there's a will, there's a way.

Adobe Cloud- Aside from using Photoshop to edit photos (which works amazingly!) I use Bridge to sort my photos and Lightroom to do a tethered capture. This allows me to see my photos on my laptop screen and be able to assess them before I need to edit them! Since I'm usually doing DIY posts, my camera is way up and I can't see the viewfinder or screen at all. For only 10 bucks a month, these programs have made a world of difference for me!

Horizontal Camera Mount- ok DIY bloggers, this one is going to blow your mind!! You honestly need this if you're doing overhead shots! It's perfect for recipes, step by step tutorials, party setups, or any type of flatlay you can imagine. It's lightweight and perfect for getting a shot with your hands in it! 

Seamless Backdrop Paper- I purchased some backdrop paper in Tulip and Baby Blue and I want all the colors now! it's great for changing up the look of your photos or even your room. I used it for my Pink Disco NYE Party and my Polly Pocket Iron On Tee pics. It's not super cheap, but it comes with quite a bit of it!

Lens Cleaning Wipes- These are amazing for cleaning your camera lens, laptop screen, or even your cell phone. They don't leave streaks, dry quickly, and are lint-free. Plus, since they're individually wrapped, you can pop them in your camera, purse, laptop bag, desk... anywhere you may find yourself needing a screen wipe!

Mouse & Keyboard- When I use my laptop, I usually use it on my lap (hah) and use the trackpad to get everything done. But, when I'm taking photos, I use the tethered capture and have my laptop across the desk from me. So, I use the mouse to get everything done! I use it to click open apps, zoom in, and press the button on Lightroom to actually take the photo. The keyboard is obviously used for typing, but it's also good for zooming into pics with the space bar, or for rotating images without needing to right click and squint to see the options.

Inexpensive Tripod- If you're just getting started, I recommend starting out with an inexpensive tripod. I used this one for months while I browsed Ebay to find an affordable fancier one. But honestly, this one did a great job! It was able to hold my horizontal camera mount, and was perfect for taking photos horizontally. I mostly upgraded because I wanted to get a camera mount to take vertical headshots and photos.

Wrapping Paper- For smaller items or messy craft projects, I like to use some cheap wrapping paper to add a pop of color. It's easy to throw away and cheap enough that I don't mind. I buy mine at the dollar tree, but you can find them almost anywhere. I recommend something slightly matte so that it doesn't reflect too much of the item on it.

If you're looking to improve your photos, I've created a FREE photography e-course to help you do just that! Be sure to sign up by clicking the photo below!

So, there you have it. My favorite photography items for beginners and bloggers! What are your must-haves for your photos? Did I miss anything? Any questions I can answer? Let me know in the comments below!

Happy Home: Colorful Bar Decor

Earlier this week, I showed you how to make easy and affordable book art. Today, I wanted to show you how I styled my bar! We've had this piece of furniture since we lived at our small apartment, so it held all our drinking glasses and acted as an entry table. Now that we have a larger home, it's only the bar. It's been a bit neglected, so I wanted to spruce it up after I added our artwork. 

*This post contains affiliate links

Add a pop of color to your bar decor! Click to see how I styled mine for everyday use.

We bought our bar at Home Goods, but I found similar ones herehere and here. I wanted to set up my bar so that it would feature all my favorite items, while still being really colorful and simple to use. You don't really want to cover it in junk that needs to be removed every time you want to make a drink, right? 

Add a pop of color to your bar decor! Click to see how I styled mine for everyday use.

I started by using my zebra tray for a drink station. I added some cute cactus glasses and my adorable confetti shaker. I love paper straws, since they are more colorful and better for the environment. I added some of my faves for easy access, and stored them in a tall shot glass/champagne flute. I put the cups on my cute glitter coasters and added painted animal and disco ball drink stirrers. I also featured my adorable Life is the Bubbles champagne flute that's handmade and oh so cute!

Add a pop of color to your bar decor! Click to see how I styled mine for everyday use.

Since there was a random empty spot in the middle, I needed something with height that didn't block the light switch. I decided to add some fun and colorful books. I don't really read these books too often (if at all) so I thought they would look nice featured on the bar instead of stuffed on my bookshelf for a change. I also added my painted sketch book that I use a lot to sketch blog post ideas, home decor ideas, etc. It added some color and pizzazz to the whole thing.

Add a pop of color to your bar decor! Click to see how I styled mine for everyday use.

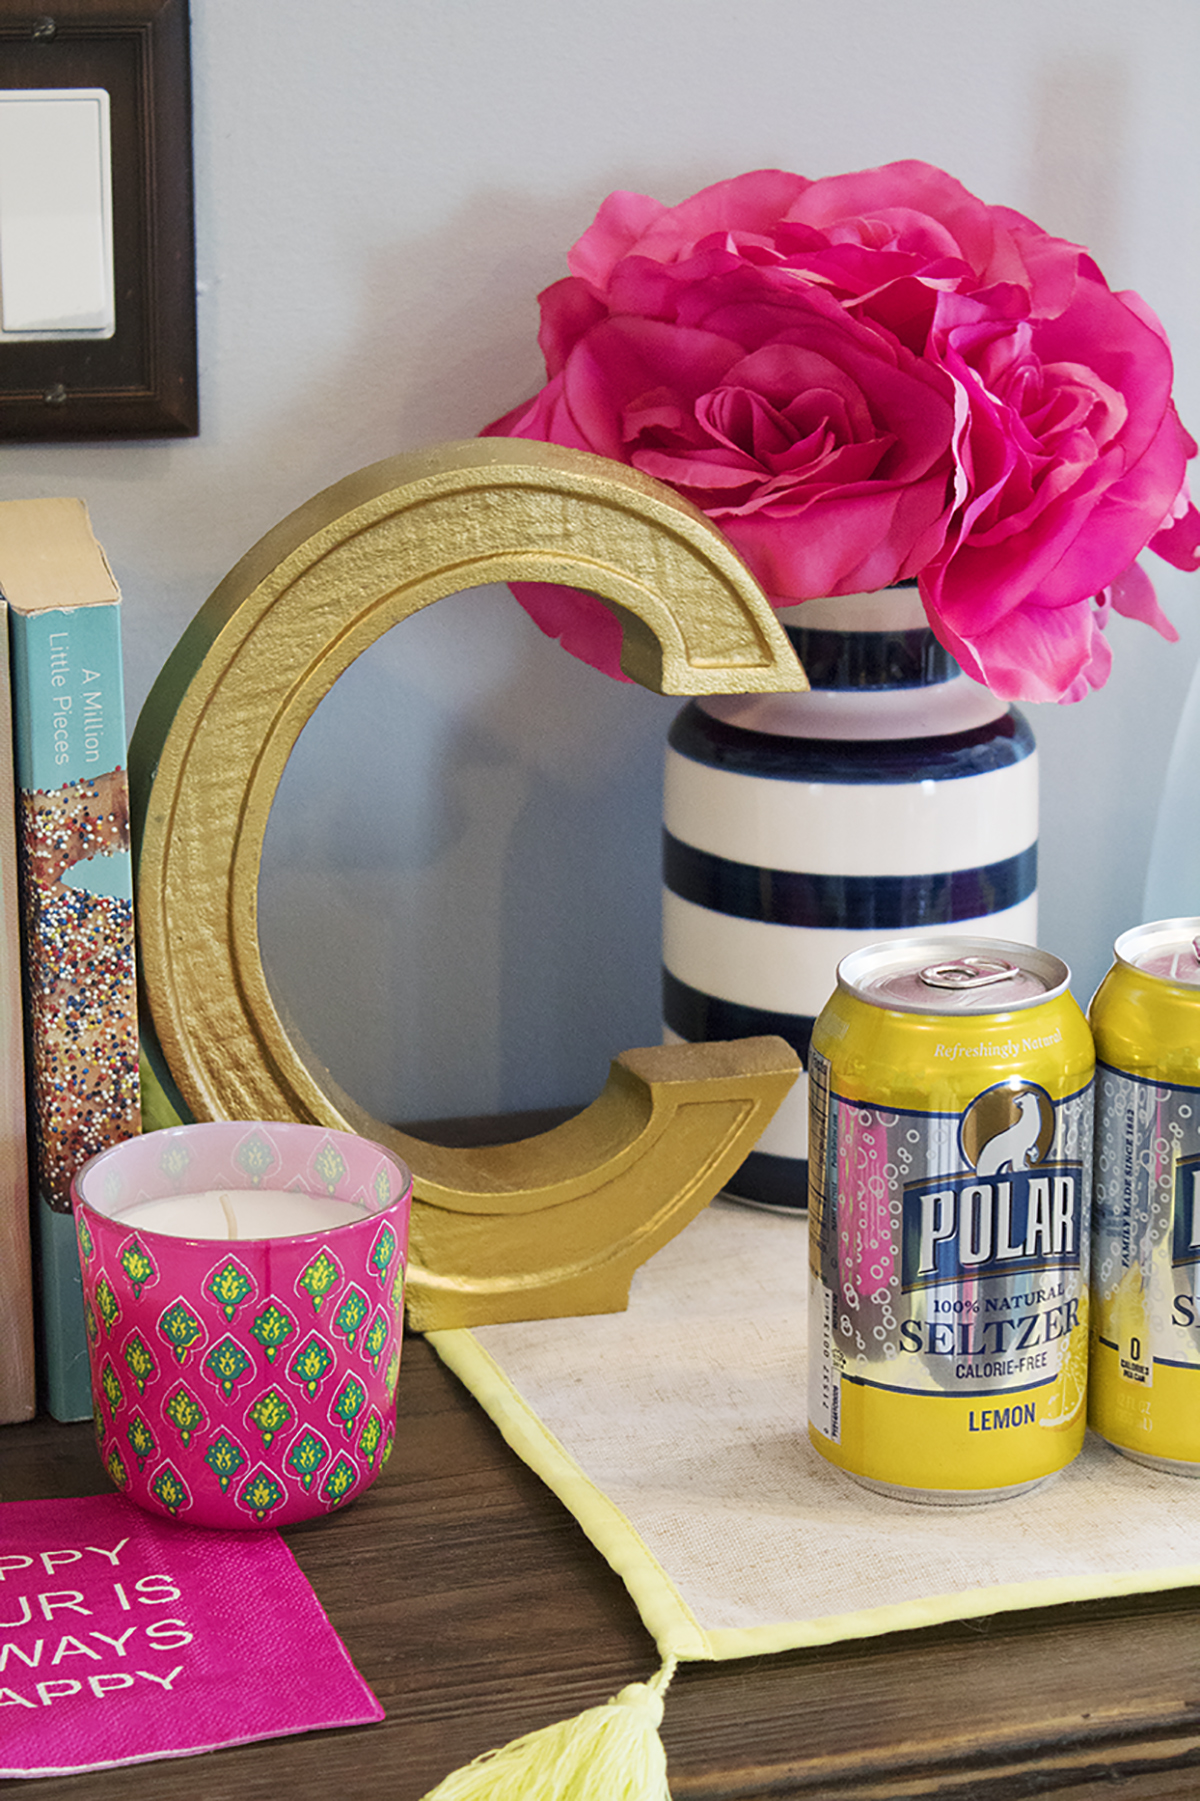
In the corner, I featured some of my favorite liquors (or are they liqueurs?) and my favorite drinking glass, a pink ombre wine glass (similar). I had two but one sadly broke, so it's extra special to me now haha. Some Polar seltzers as mixers help guests to serve themselves, while fake flowers add some elegance without any upkeep.

Add a pop of color to your bar decor! Click to see how I styled mine for everyday use.

I placed these items on an extra placemat I had from my dining table, and a C (for Cardona) statue thingy that I usually put on my entry table. I thought it looked really elegant amongst all the colorful bar items. For a finishing touch, I added my pineapple garland to add a bit of whimsy to the space.

Add a pop of color to your bar decor! Click to see how I styled mine for everyday use.

To fill in the gaps, I gathered some random decor items from my home. I had these fake potted plants from an Easter DIY so I added them in for some color. I love these candles that I got from Ikea so I added those as well. Some appropriately themed napkins added a finishing touch and an extra pop of color.

Add a pop of color to your bar decor! Click to see how I styled mine for everyday use.

If you want to have a bar in your home for parties but don't have room for a permanent piece of furniture, I highly recommend this foldable bar cart. It's really compact, sturdy and it works indoor and out! It's really versatile and I love mine. It's also a great add-on for bigger parties.

Do you have bar cart at home? How do you style it? Let me know in the comments below!

DIY Affordable Book Art

As I mentioned in my last post, I've got a serious lack of artwork in my home! I wanted to find some cute and colorful cocktail-related images for above my bar, but everything was either cheesy or expensive. Also, the space is a weird size- there's a light fixture above and a light switch below, so I only had about 2 feet in between for art. I had a book of cocktails that I rarely used, which had some GORGEOUS photos inside. That's when it hit me- why hide the images in the book, when I could display them proudly on the wall?! I went to Michael's to pick up some cute and simple white frames with a mat so the images would take up enough space while also "popping" against the frame. I'm sooo happy with the result that I decided to show you guys exactly how I did it.

Got a spot that needs some artwork? Why not save some money and use some artwork from your books?! It's affordable and easy as can be. Click for the full how-to.

The best part is that you can use any type of book or magazine that you have. My suggestions? HGTV books and magazines for cool and colorful homes, Cooking Magazines or Recipe Books with tasty recipes for the kitchen, and Artwork Books and Magazines for the rest of the home. Even National Geographic would be great with its artistic animal photos!

*This post contains affiliate links

You will need: 

Frame (from Michaels, similar here)
Books (here)
 

Directions:

Got a spot that needs some artwork? Why not save some money and use some artwork from your books?! It's affordable and easy as can be. Click for the full how-to.
  1. Flip through your book or magazine to find your favorite images. Tear them out as close to the spine as you can.
  2. Remove the back of your frame and take out the placeholder image and the mat.
  3. My mat was double layered white and gray, so I carefully pulled off the gray one from underneath to leave only the white one. It worked perfectly!
  4. Position your artwork within the mat, and tape in place if needed.
  5. Place the mat and artwork into the frame, and close up the back. Make sure there is no dust or hairs on the inside of the glass before you do!
Got a spot that needs some artwork? Why not save some money and use some artwork from your books?! It's affordable and easy as can be. Click for the full how-to.

I mean... how cute does this artwork look?! This is such an affordable way to add some artwork to your home, especially if you have gorgeous books that you occasionally look at but don't use. This way, everyone can see the beauty within- right there on the walls! I also styled my bar with some really cute, colorful stuff. That blog post is coming later this week, so stay tuned!

Are you planning to create your own book art for your home? Let me know what you plan to use in the comments below!

Colorful Easter Brunch Party Idea

Welcome everyone, to what is probably the last Easter party/DIY of the season. In all fairness, I’m Greek Orthodox so my Easter is next Sunday (April 8) and so for that I’m right on time! It’s always weird to get the timing right, since I’m always thinking I have an extra week. For this reason, I wanted to keep this Easter table really simple and colorful. And best of all, affordable! I realized a lot of blog posts and parties can break the bank, and I know us millennials are on a budget. Like, always... so, here’s a very cheap, easy, and gorgeous Easter setup made for any budget! 

*This post contains affiliate links.

A lot of blog posts and parties can break the bank, and I know us millennials are on a budget. Like, always... so, here’s a very cheap, easy, and gorgeous Easter setup made for any budget! 

I kept the table setup simple and glam by using this sequin table cloth. My sister got it for my bridal shower, and I’ve been using it ever since! It’s seriously gorgeous while not being too expensive. If you want to keep it even more budget friendly, opt for a white tablecloth (or whatever pastel color you have, really) and add a sequin table runner. At only $9 it’s a steal! All the glam, a fraction of the price. 

A lot of blog posts and parties can break the bank, and I know us millennials are on a budget. Like, always... so, here’s a very cheap, easy, and gorgeous Easter setup made for any budget! 

For the table settings, I stacked some inexpensive plastic plates as sort of “charger plates” and added a cute Easter plate on top. This plate was from the dollar store! Holla for a dolla!! I’m sure you could find something equally cute in your local dollar store but if not check Target or even Party City for another option. I got my napkins from Home Goods. Did you know they have a party supplies section?! With some awesome, hard to find brands as well. These are from Meri Meri and only cost me 5 bucks. Score! I added some gold utensils to make the polka dots pop and I just love how they pick up all the rainbow colors. 

A lot of blog posts and parties can break the bank, and I know us millennials are on a budget. Like, always... so, here’s a very cheap, easy, and gorgeous Easter setup made for any budget! 

Speaking of rainbow colors... how cute is this streamer paper backdrop?! It’s so easy and cheap to make. I got my crepe paper from, you guessed it, the dollar store! Then I measured out one piece to find the length, went color by color and cut out a whole roll of each. I had a lot extra (like, a lot...) so unless you’re doing a big wall, you may only need half a roll. Mine didn’t go all the way down either, so that would affect how much you need as well. Once I tore all the pieces to the right length (that’s right, tore with my hands... like an animal) I taped them up in color order. Super cute, super easy, super colorful. 

A lot of blog posts and parties can break the bank, and I know us millennials are on a budget. Like, always... so, here’s a very cheap, easy, and gorgeous Easter setup made for any budget! 

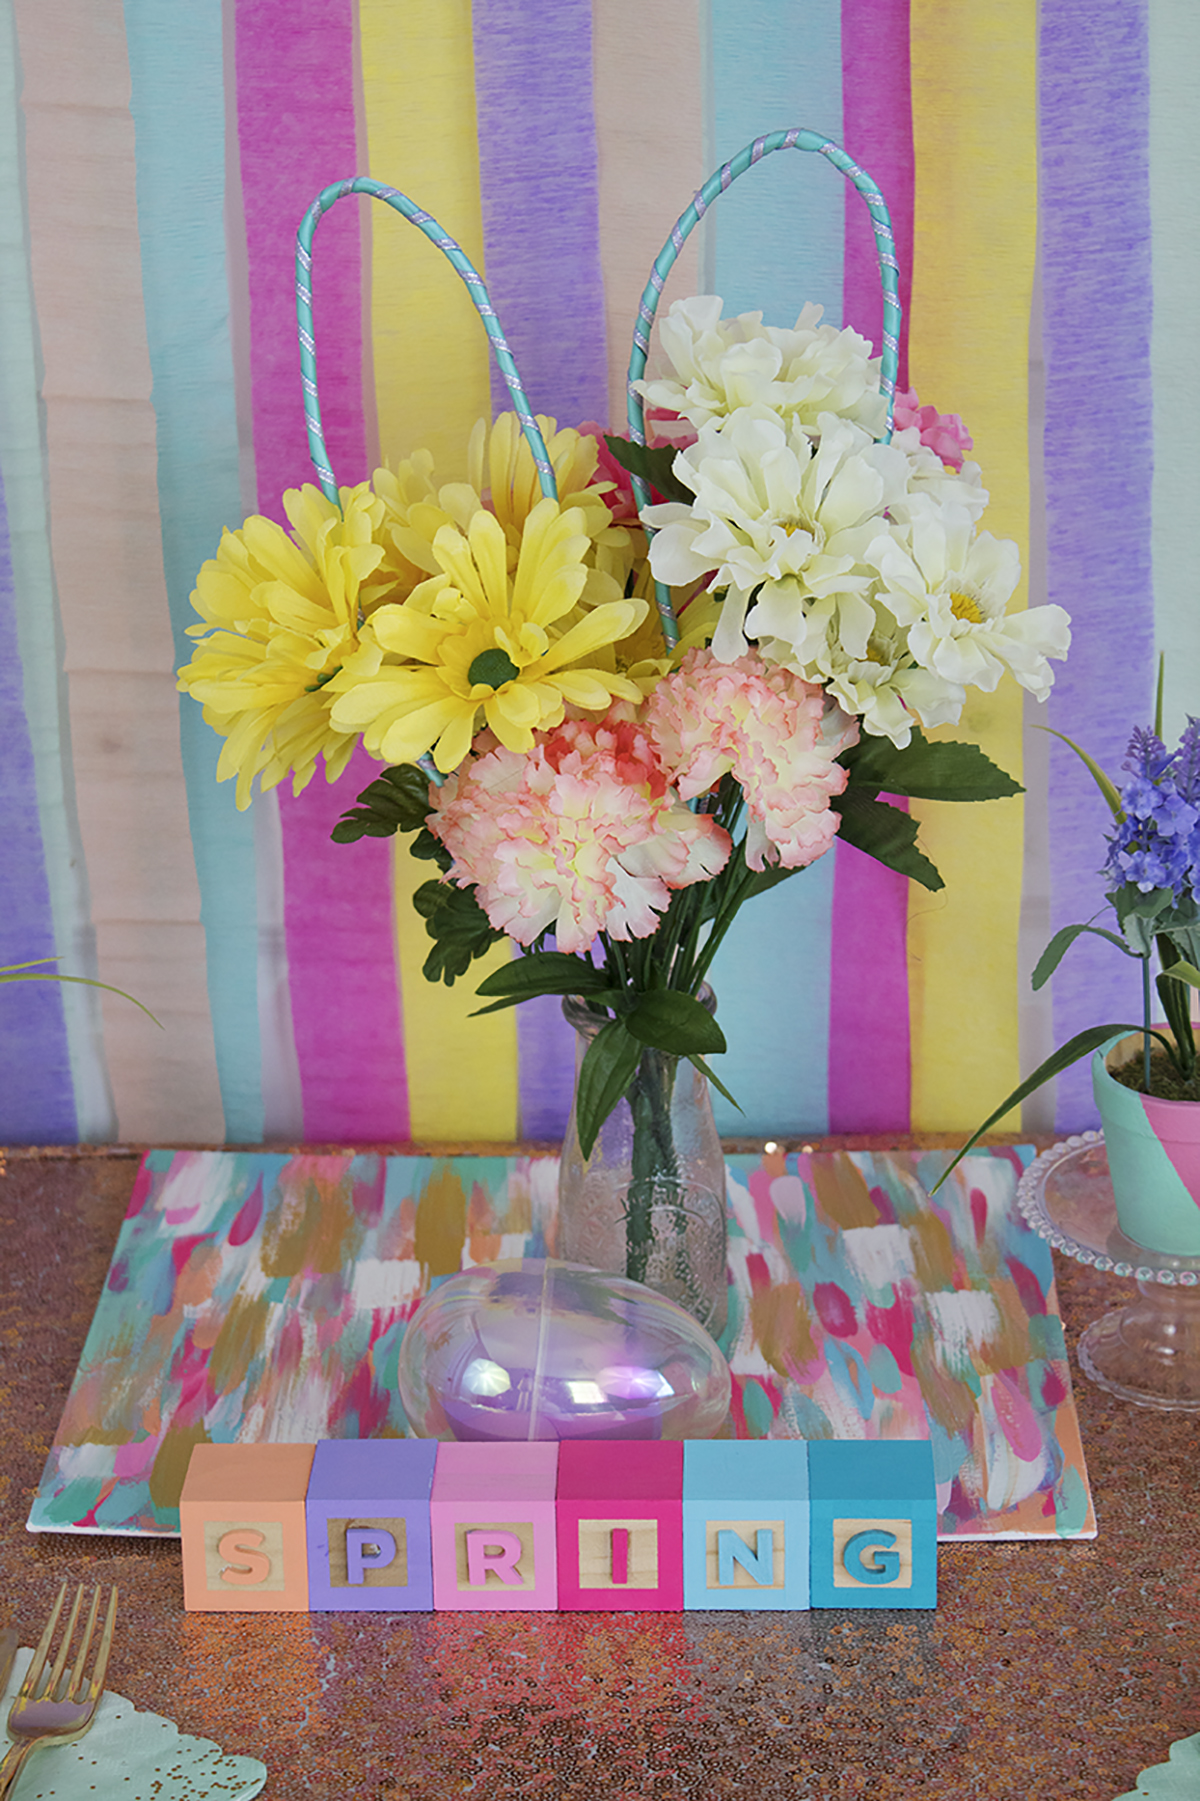
Now, to spruce up that table! I added some dollar store flowers I got last year and added the bunny ears I made last Easter. I put them in a simple milk jug vase that I got from (you guessed it!) the dollar store and placed that on a “placemat” that’s actually artwork! You can find the easy DIY for that here. I added some holographic Easter eggs (what?!) from Target filled with smaller Easter eggs. A small white crate from my wedding was filled with colorful rainbow Easter eggs and honeycomb balls. And, we can’t forget about bunny ears! A pile of headbands ensures that everyone is in the holiday spirit. 

A lot of blog posts and parties can break the bank, and I know us millennials are on a budget. Like, always... so, here’s a very cheap, easy, and gorgeous Easter setup made for any budget! 

And, let's talk about those blocks! I really wanted a set of pastel rainbow blocks for an Instagram project I was going to do. Unfortunately, they were impossible to find so I made my own! I have a DIY for these coming soon, but I couldn't resist adding them to my Easter post. 

A lot of blog posts and parties can break the bank, and I know us millennials are on a budget. Like, always... so, here’s a very cheap, easy, and gorgeous Easter setup made for any budget! 

And that’s all there is to it! A simple, affordable Easter table setup that will wow your family without breaking the bank. A lot of the items I either had on hand, used last year, or purchased very inexpensively. 

Pssst. Looking for some assistance planning your next big event? I can help! Visit my virtual party planning services page for more info and pricing.